
Pro Login User Management System is a powerful PHP script designed to allow you to manage your users. The application is a great way to build your website, allowing your users to register an account and build restricted access to certain users. It’s powered by mysql and PHP and is built on the CodeIgniter platform.
This is the documentation for the Pro Login User Management System. If you have any trouble setting up your system, feel free to contact us and we'll be happy to help get it going for you.
Simple Setup - top
Installing the software is simple. You'll need the following information:
- FTP Details
- MYSQL database details (username, password, database).
Uploading Files
- First locate the core files in the folder: core_files/core.zip and extract them.
- Upload the files to your main web directory. A sub folder is fine too.
- CHMOD the following files temporarily to 0777: application/config/config.php, application/config/database.php and .htaccess (in the root folder).
- Run the setup.php file in the main document of the file. So if you installed your site in http://www.example.com/mysite/, you would run http://www.example.com/mysite/setup.php.
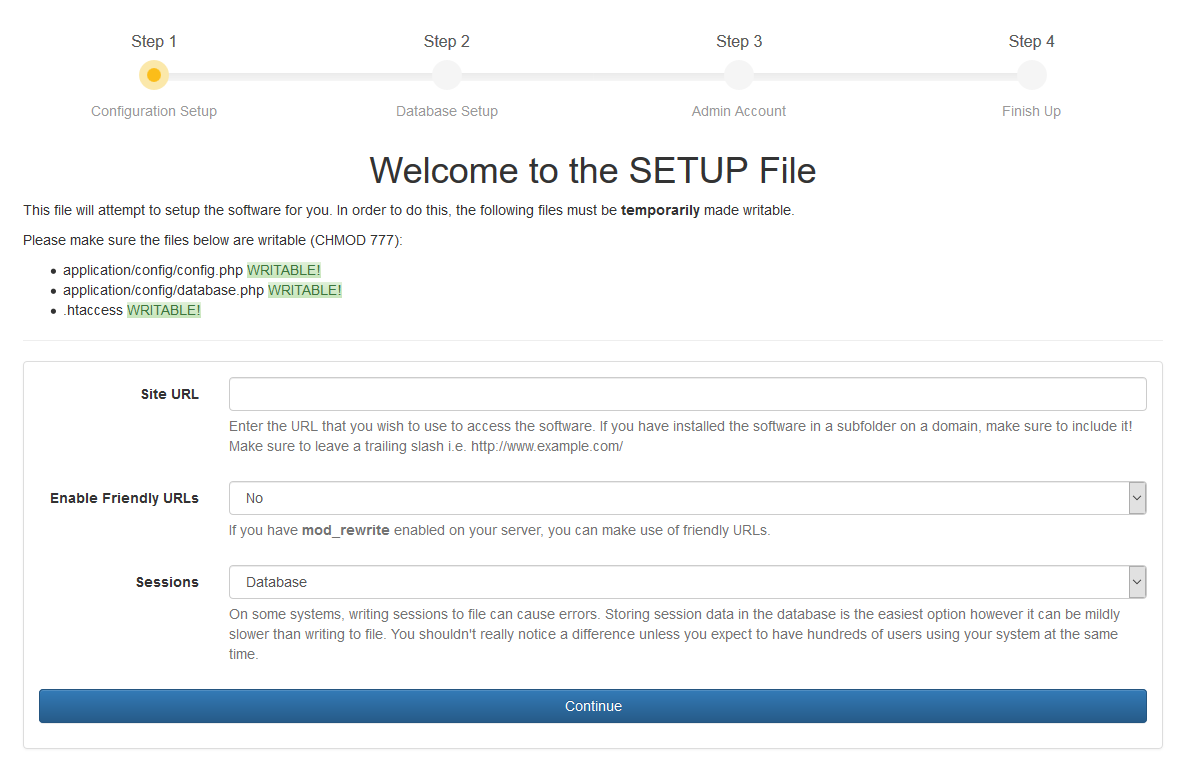
- Follow the step by step instructions that allow you to setup the system.
- If you have issues using the setup.php file, please refer to the Setup & Installation document which will give you a step by step guide of setting up the system manually.
If you want a more detailed install guide which explains everything more clearly, check out our Setup & Installation document.
How to CHMOD
CHMOD is the process of setting a file's read/write permissions. In order to run the setup.php, it needs to be able to write to 3 core files temporarily whilst you run the setup. You'll need to set the files above to 0777 which grants the setup the correct access. To CHMOD a file, you need to navigate to the file in your FTP and right click the file. You'll want to look for something like permissions, chmod, or properties. Here you'll be able to set the CHMOD value.
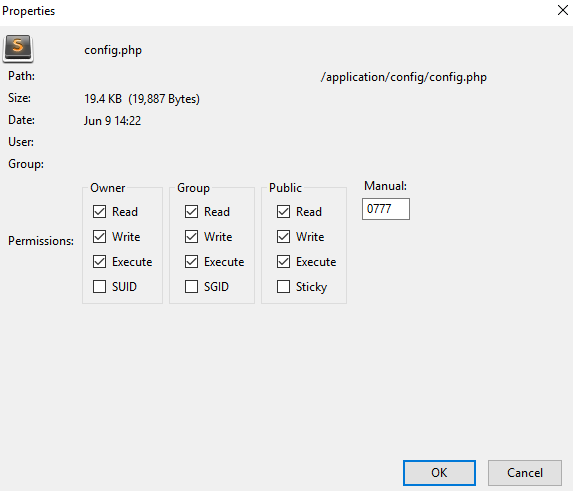
Once you have completed the setup, chmod the files back to their default of 0644.
Setup & Installation - top
Quick Setup
If you want to run the quick setup file, please refer to the Simple Setup document. This file will quickly setup your system for you, all you need to do is provide the correct details for your website. If you're having trouble using the simple setup, follow this guide to manually run the setup.
Uploading Files
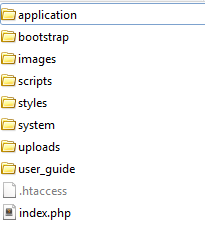
Once you have downloaded your file from the Envato Marketplace, you will need to extract the files from the ZIP file. You will need to upload the product core files to a webserver. First locate the core files in the folder: core_files/core.zip. You will need to extract the files from the zip and upload them so that these files are in your main directory on your webserver, usually this is the public_html folder. If you wish to upload them to a sub-folder, this is fine too- just make sure you read the footnotes about installing in a sub-folder.
Your webserver's main directory should look something like this:
Config Settings
Before you can use your product, you will need to edit the config files. First locate the config file in: application/config/config.php and open it up using a text editor such as notepad. The only line you should need to edit is the:
$config['base_url'] = 'http://www.example.com/';
Replace the http://www.example.com with your own domain name, making sure you keep the quotation tags around it as above. There are some other settings that you can also edit in this file if you feel the need to customise your product further but for a basic installation this is all you should need to edit. Save the file and overwrite the existing one on your webserver.
Database Settings
The second file you will need to edit is your database file. Find the file: application/config/database.php and open it up using a text editor like Notepad. You will need to edit the lines listed below with your own database login information. For the most part, host stays the same as localhost unless your web host specifies to you otherwise. You will need your database name, database username and database password.
$db['default']['hostname'] = 'localhost';
$db['default']['username'] = 'your_username';
$db['default']['password'] = 'your_password';
$db['default']['database'] = 'database_name';
Once you have modified this file, save it and overwrite the existing one on your webserver.
Next you will need to execute the SQL file that came with the product download. This file will create the database tables that are used to store the data of your application. Usually you can import the SQL tables by using a database management system like PHPmyAdmin. The SQL file is located in core_files/database.sql in the product download.
To Import the file, login to your database management system, such as PHPmyAdmin. Make sure you are on the database that you named in the database.php config file then locate the Import Tab on PHPmyAdmin.
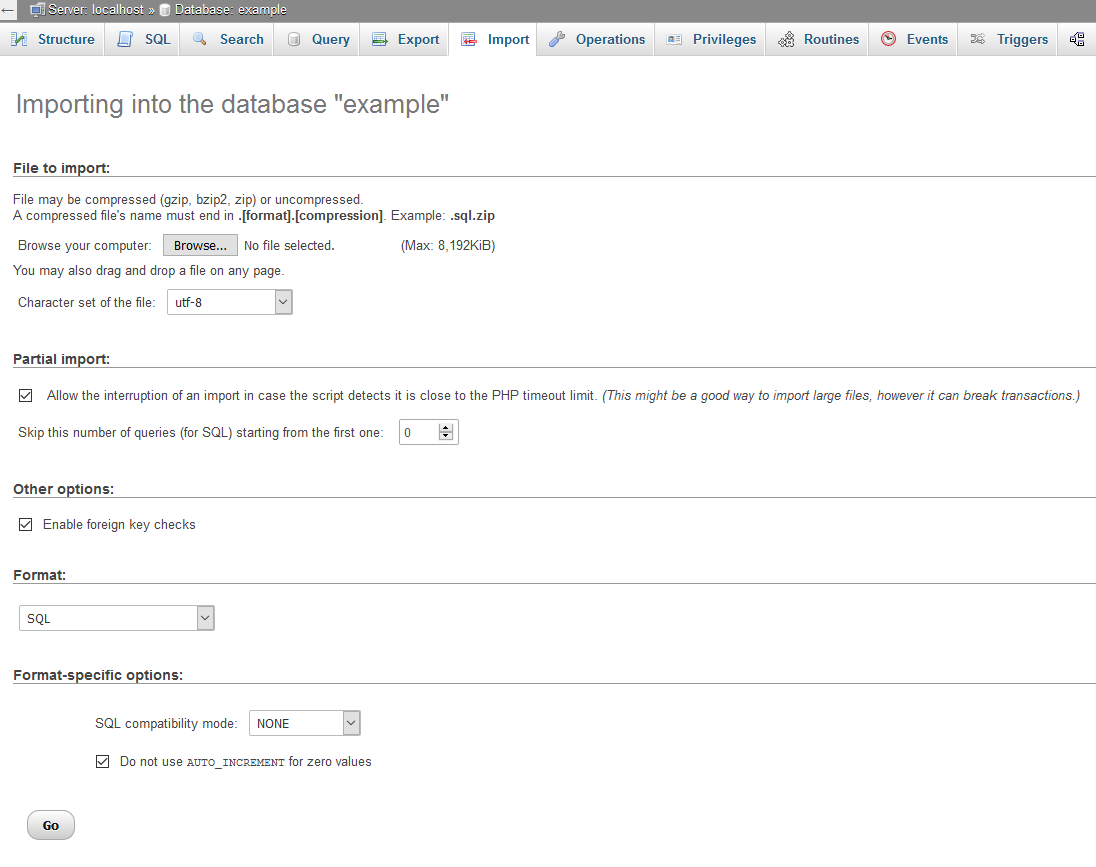
Next select the browse button (as shown in the screenshot above) and locate the SQL file (core_files/database.sql) from your product download file. Next click the Go! button and you should now see database tables appear in the left sidebar.
Mod Rewrite
We use a URL routing trick called mod_rewrite. This is normally installed by default on most web servers and allows for URLS like: http://www.example.com/some/file/here/ instead of http://www.example.com/myfile.php.
If you don't have mod_rewrite settings enabled on your web server, you can still use the application by setting your index_page value to the following line in the application/config/config.php file:
$config['index_page'] = 'index.php';
This setting will make it so your URLs have index.php in them. However, the default setting is to remove this and assumes you have mod_rewrite enabled on your webserver.
Creating the Admin Account and Setup Site
Finally, you will need to run the install file in your web browser. A notification will pop-up on the site once you have filled out all the database settings and config settings linking you to the install file. Or you can locate it by going to http://www.example.com/install/ where example.com is replaced by your own. Here you'll be able to create the Admin account with full access to the site as well as some initial site settings.
If you're having problems accessing this URL, double-check that you entered the correct information in the application/config/config.php file. If you are sure that it is correct, it may be something to do with your webserver's settings with allowing mod_rewrite. The problem most notably is usually with the .htaccess file in the main directory- make sure this file is in your main directory (like in the directory screenshot above). If you still have problems, check out our Knowlege Base or feel free to contact us.
If you added index.php to your config setting index_page in the application/config/config.php file, the URL to install will be: http://www.mydomain.com/index.php/install/.
IMPORTANT: Once you have installed the product, please delete the file application/controllers/install.php! This will prevent other users from messing up your settings. Please also delete setup.php and setup_db.sql in the main directory.
Installing In A Sub-Folder
If you're installing the software in a sub-folder, such as http://www.example.com/my_subfolder/ then you will need to modify the .htaccess file inside the main directory (the one that holds the application, bootstrap folders etc). All you need to do is open up the .htaccess file in your text editor and copy the following code, replacing the sub-folder with the name of your sub-folder (in this example, the sub-folder is called sub_folder_name_here. Replace this with the name of your sub-folder).
RewriteEngine On
RewriteBase /sub_folder_name_here
RewriteCond %{REQUEST_FILENAME} !-f
RewriteCond %{REQUEST_FILENAME} !-d
RewriteRule ^(.*) index.php?/$1
Save the file as .htaccess and overwrite the one inside your main directory that you used to install the software in (the folder containing the application, bootstrap folders etc). You can skip this step if you're installing in your main folder.
Application Structure - top
This application is built up around the CodeIgniter framework. CodeIgniter is built directly into the software, so you don't have to do anything extra to use it.
For developers, this framework is freely available on the internet and documentation for using the source code can be founded on their website: http://www.codeigniter.com/user_guide/.
CodeIgniter is a PHP Framework written in MVC (model-view-controller) format which allows developers to create applications that are structured in a very clean and efficient way. When you unzip the product download (core_files/code.zip), you will be presented with the following directory structure. Below is a quick overview of where you can find various files if you are new to using CodeIgniter.
- application - This is where the main application files are kept. It includes the configuaration files, the class controllers, models and view files. If you want to make changes to the application, you should modify these files.
- bootstrap - The bootstrap Javascript and CSS files.
- images - Images used in the application are stored here.
- scripts - Custom Javascript files made for use with the application.
- styles - Custom CSS files made for use with the application.
- system - The core CodeIgniter files are present here. These should not be modified unless upgrading the CodeIgniter version.
- uploads - This folder is used to store user uploads.
- user_guide - Documentation on how to use CodeIgniter.
- .htaccess - This file is used to tell your web server to process URLs.
- index.php - The application bootup file.
You can find more information on directory structure at the CodeIgniter website and reading the User Guide: http://www.codeigniter.com/user_guide/
Where Everything Is - top
This part of the guide is to show you where the most common elements of the site are located. Remember, this site uses CodeIgniter Framework, so for well-documented additional support, please use their website and user guide: http://www.codeigniter.com/user_guide/
Styling & CSS
The site's styling is based off Bootstrap 3; Bootstrap 3 comes with lots of predefined CSS elements that you can use to create well presented websites with. You can view the Bootstrap documentation and examples here: http://getbootstrap.com/. If you wish to upgrade the Bootstrap version or make your own changes to it, you can find the files in the bootstrap/ directory.
The product also uses it's own custom styling to create the site layout. You can find the stylesheet file in styles folder.
Modify HTML / Frontend interface
The template files, also known as views, can be found in application/views/. These files contain the HTML of the site and modifying these files allows you to change the way the site presents data. These files also contain some PHP code so it's important to know what you're doing when editting these files.
The layout file can be found in application/views/layout/layout.php.
PHP Logic & Database Models
The controller files, which contain the site logic, can be found in application/controllers/ folder. These are PHP files that are used to control how the site works.
The model files can be found in application/models/ which contain the database logic.
Javascript & Libraries
The Javascript files can be found in the scripts/ folder. The custom/ folder contains custom made scripts for the site and the libraries/ folder contains 3rd-party plugins that we use.
Login And Register - top
When you have successfully installed the ProLogin system, you should be presented with a frontpage like the one below. This is the login screen that is presented to all your users. You can login by using the Email Address and Password that you created in the Install file.
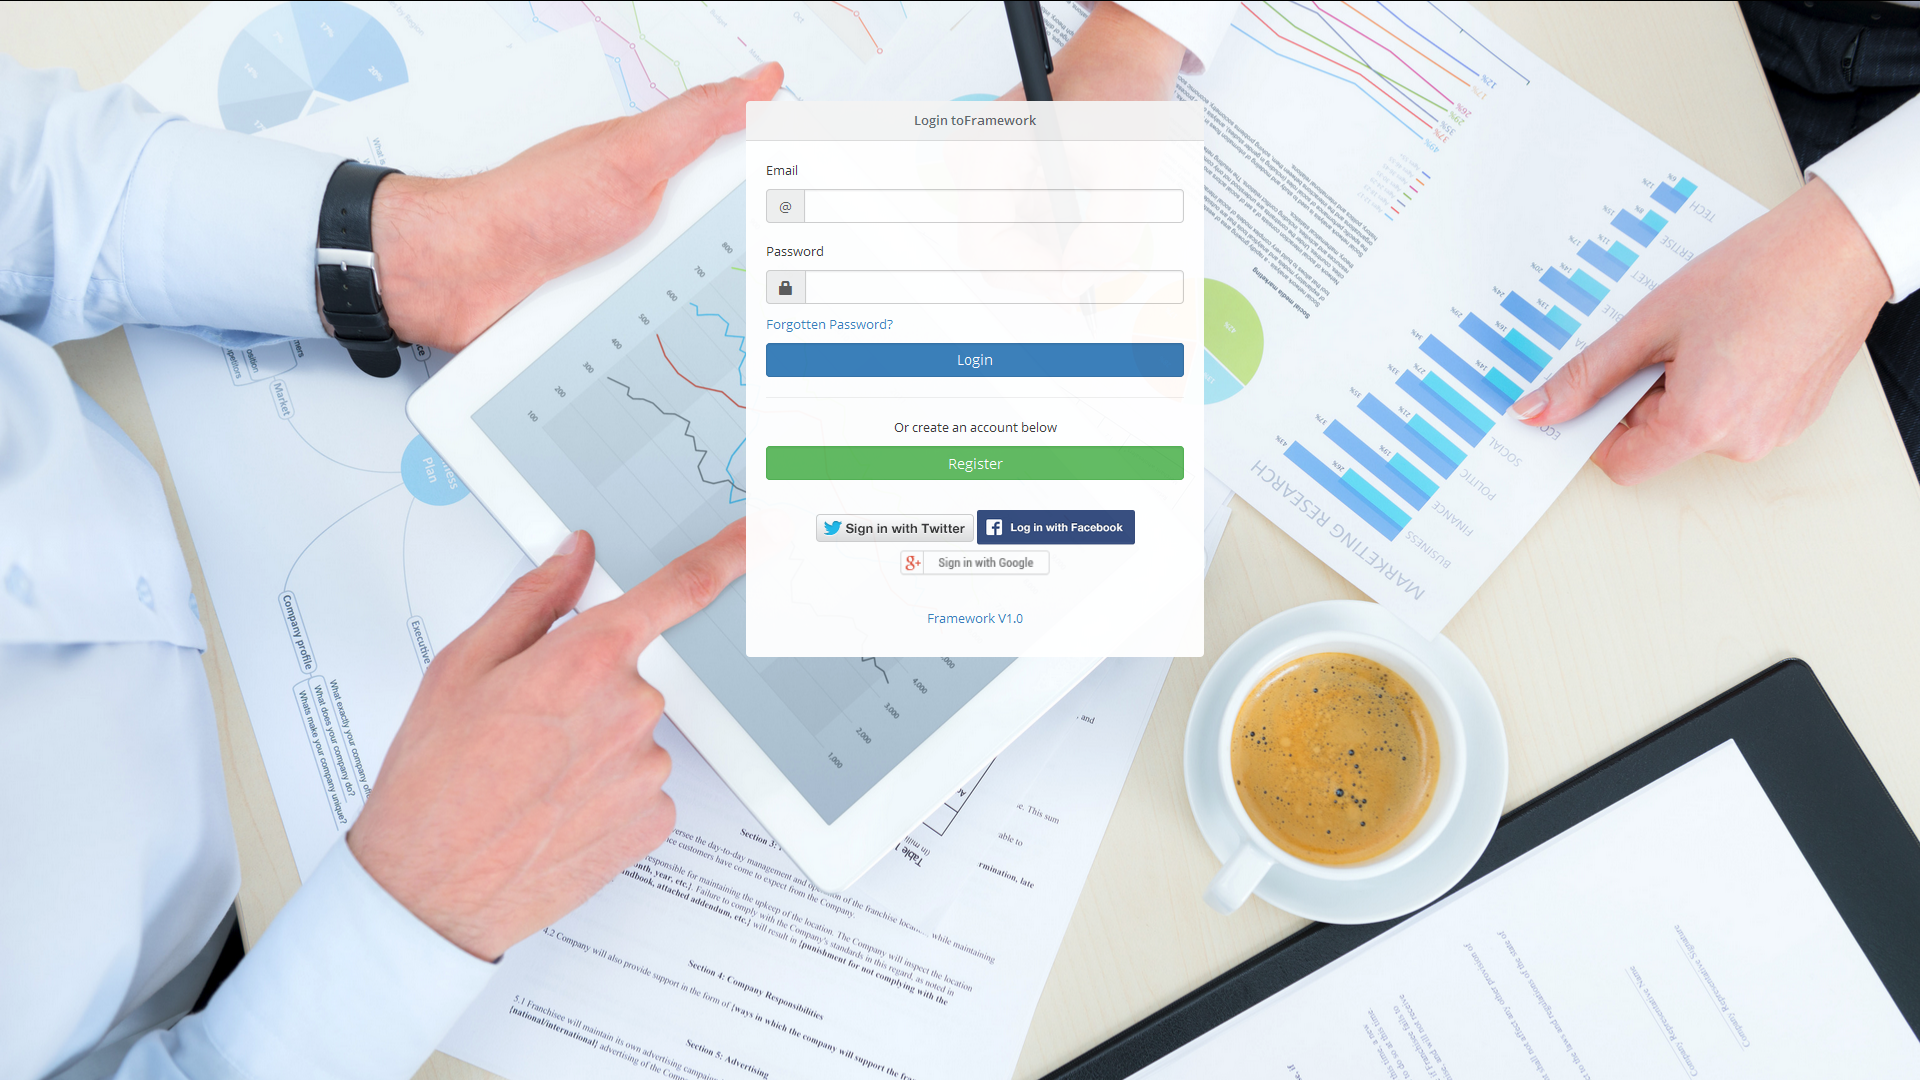
Users can also login using their social network accounts for Twitter, Facebook and Google. You will first need to setup your social network keys before you can enable this option. View our Social Network setup guide in the documentation.

Also presented on this page is the register button. Clicking it takes you to the simple registration form that allows users to register on your site. You can disable registration in the Admin Panel.
Dashboard - top
The Dashboard is the welcoming page for logged in members. Here it gives you a quick overview of your site's stats, as well as some useful information regarding the newest members of your site and overall progress from the last 6 months. This information is cached, so it updates every couple of hours to save system resources.
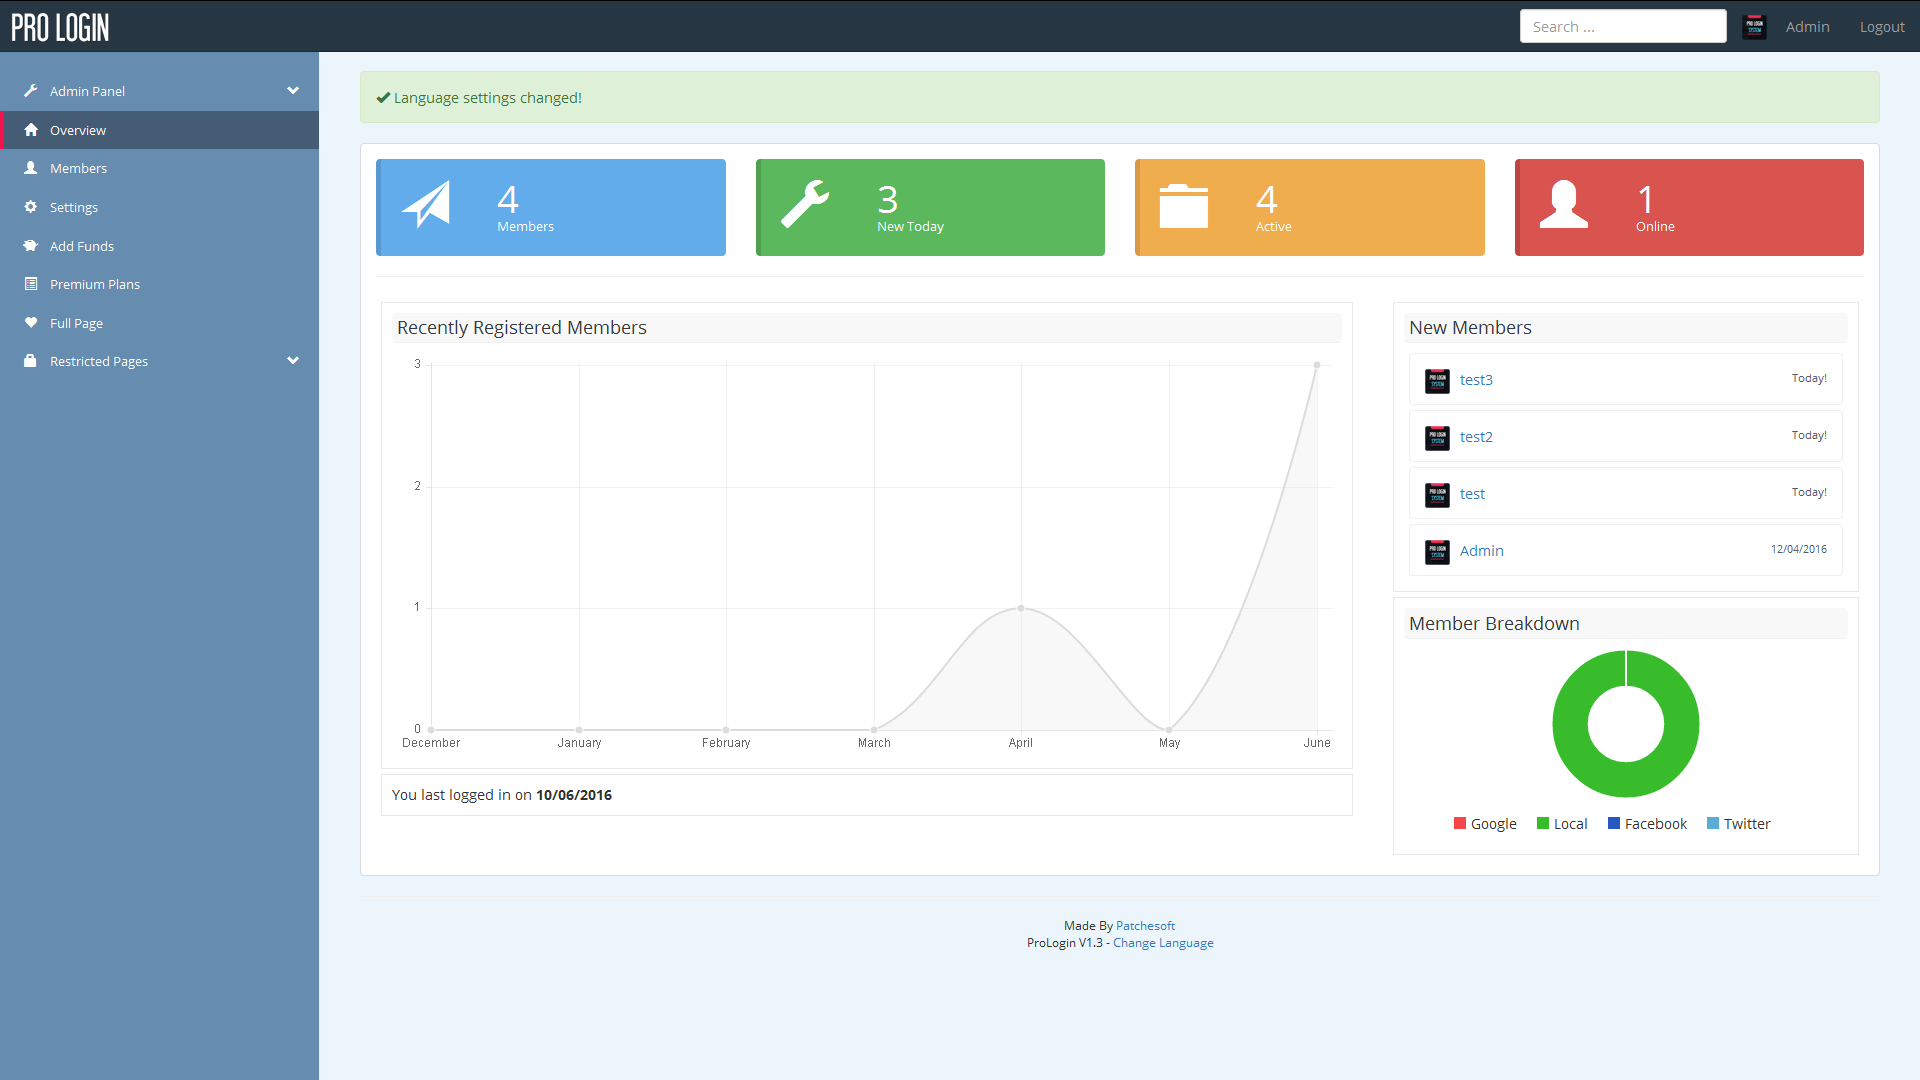
This area shows you information on your User Base. It displays the newest registered users, the amount of users registered for the past 6 months and also a breakdown of where your users are coming from.
You will also notice a sidebar which has some useful links that you can navigate. If you are logged in as an Admin user, you will notice the Admin Panel link. Clicking on it will expand the menu, presenting you with more options.
You can modify the HTML for this file in: application/views/home/index.php. The PHP login can be found in application/controllers/Home.php.
Members - top
A members page is available for all your members to view.
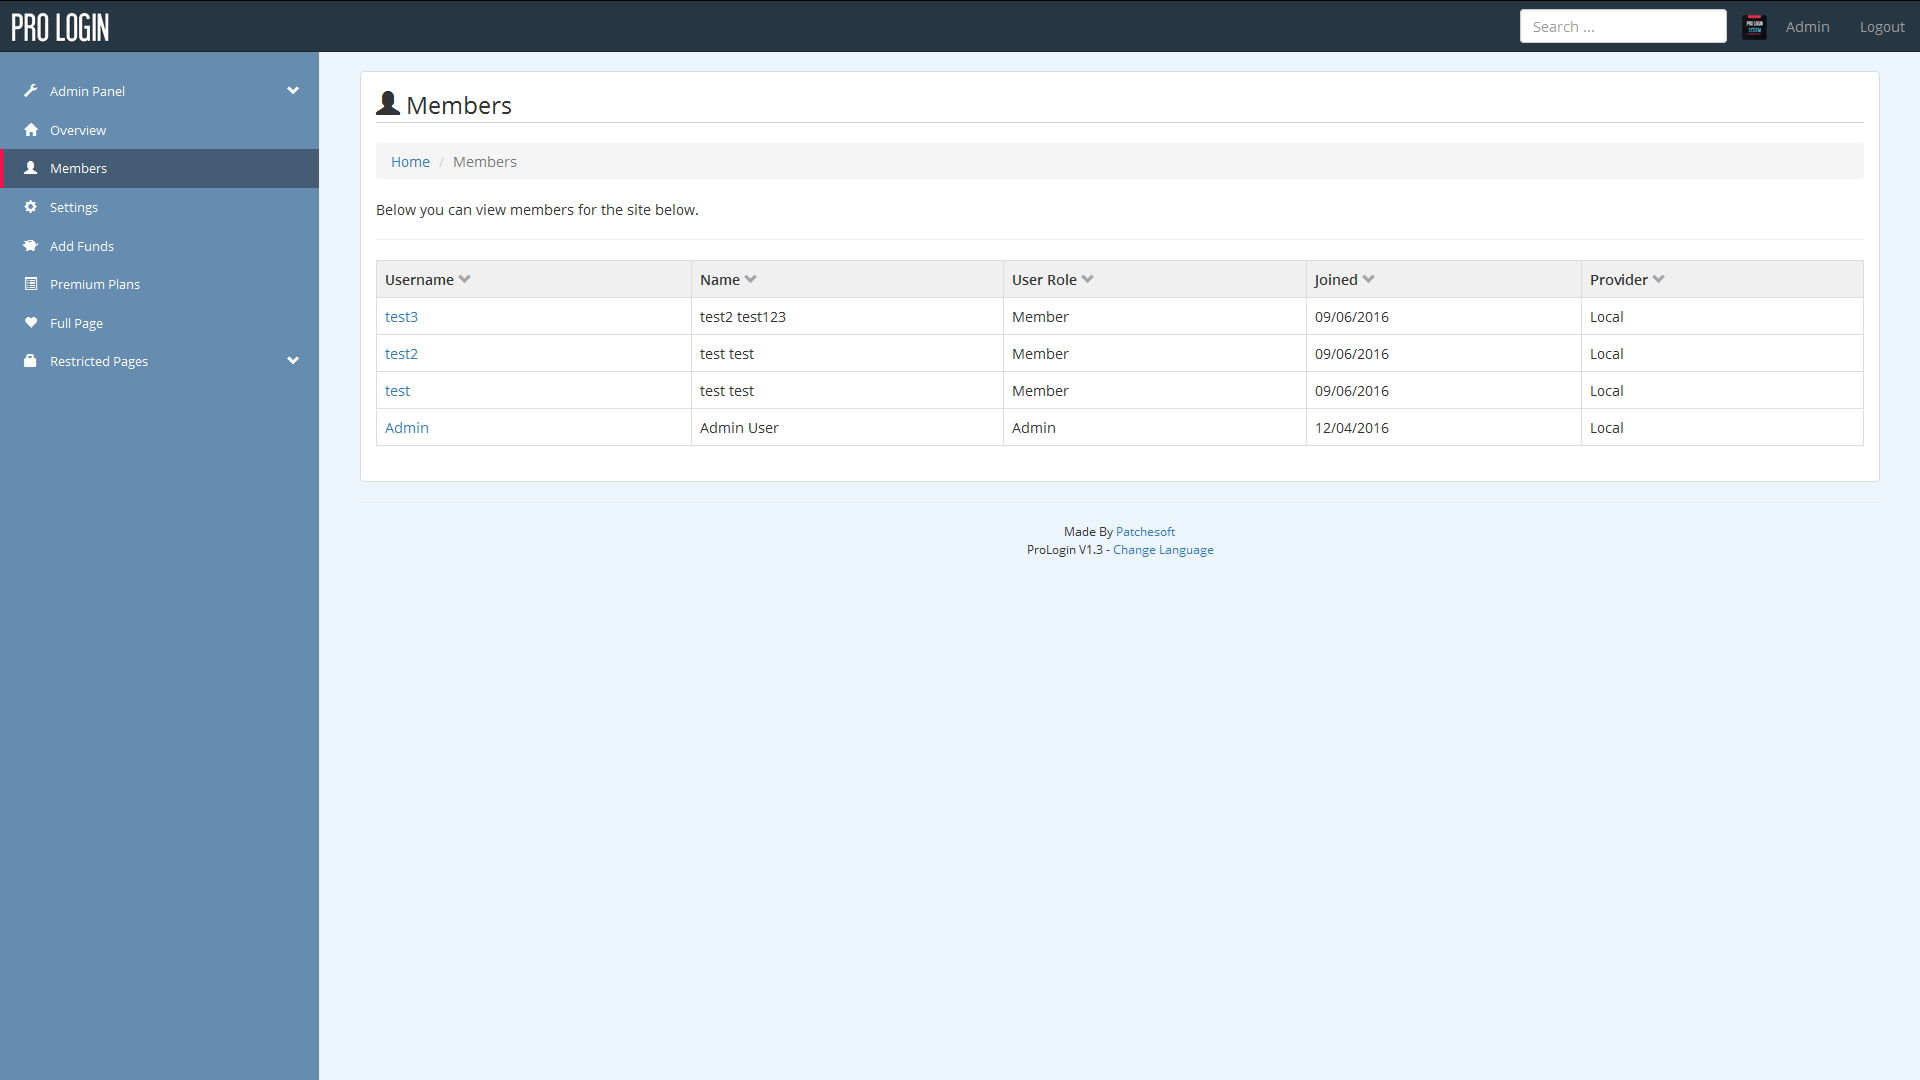
You can view a user's username, when they joined, where they joined from and what kind of member they are. You can also click their username to go the user's profile.
You can sort the member list by clicking on the table column headers. Sort by Username, date joined, name, user level and provider.
You can also search members by using the top search bar at the top of the page. This allows you to search by Username.
User Settings - top
The User Settings page can be found by clicking on the Settings link. These settings are for each individual user.
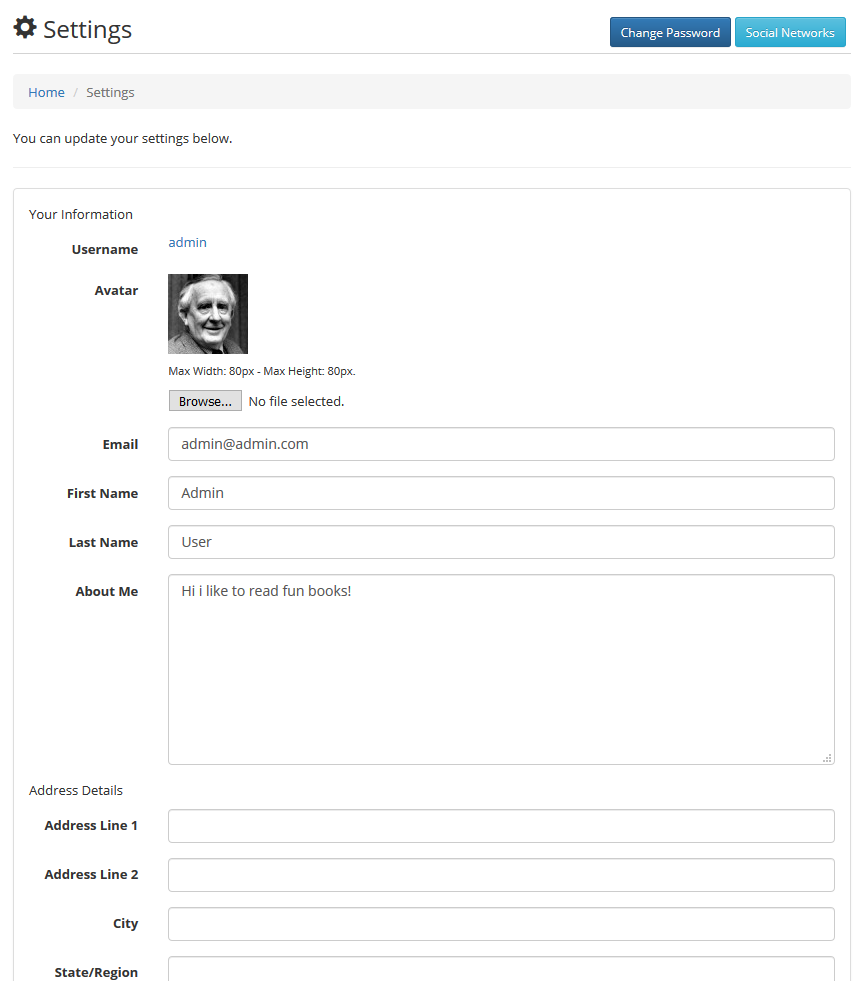
Here a user can upload an avatar, change their name and edit their About Me section which appears on their profile page.
A user can also change their password by clicking the Change Password button in the top right corner.
Admin Panel - top
The Admin Panel only shows to users with an Admin status account. You can create your Admin account by using the Installer as mentioned in the Install Guide above.
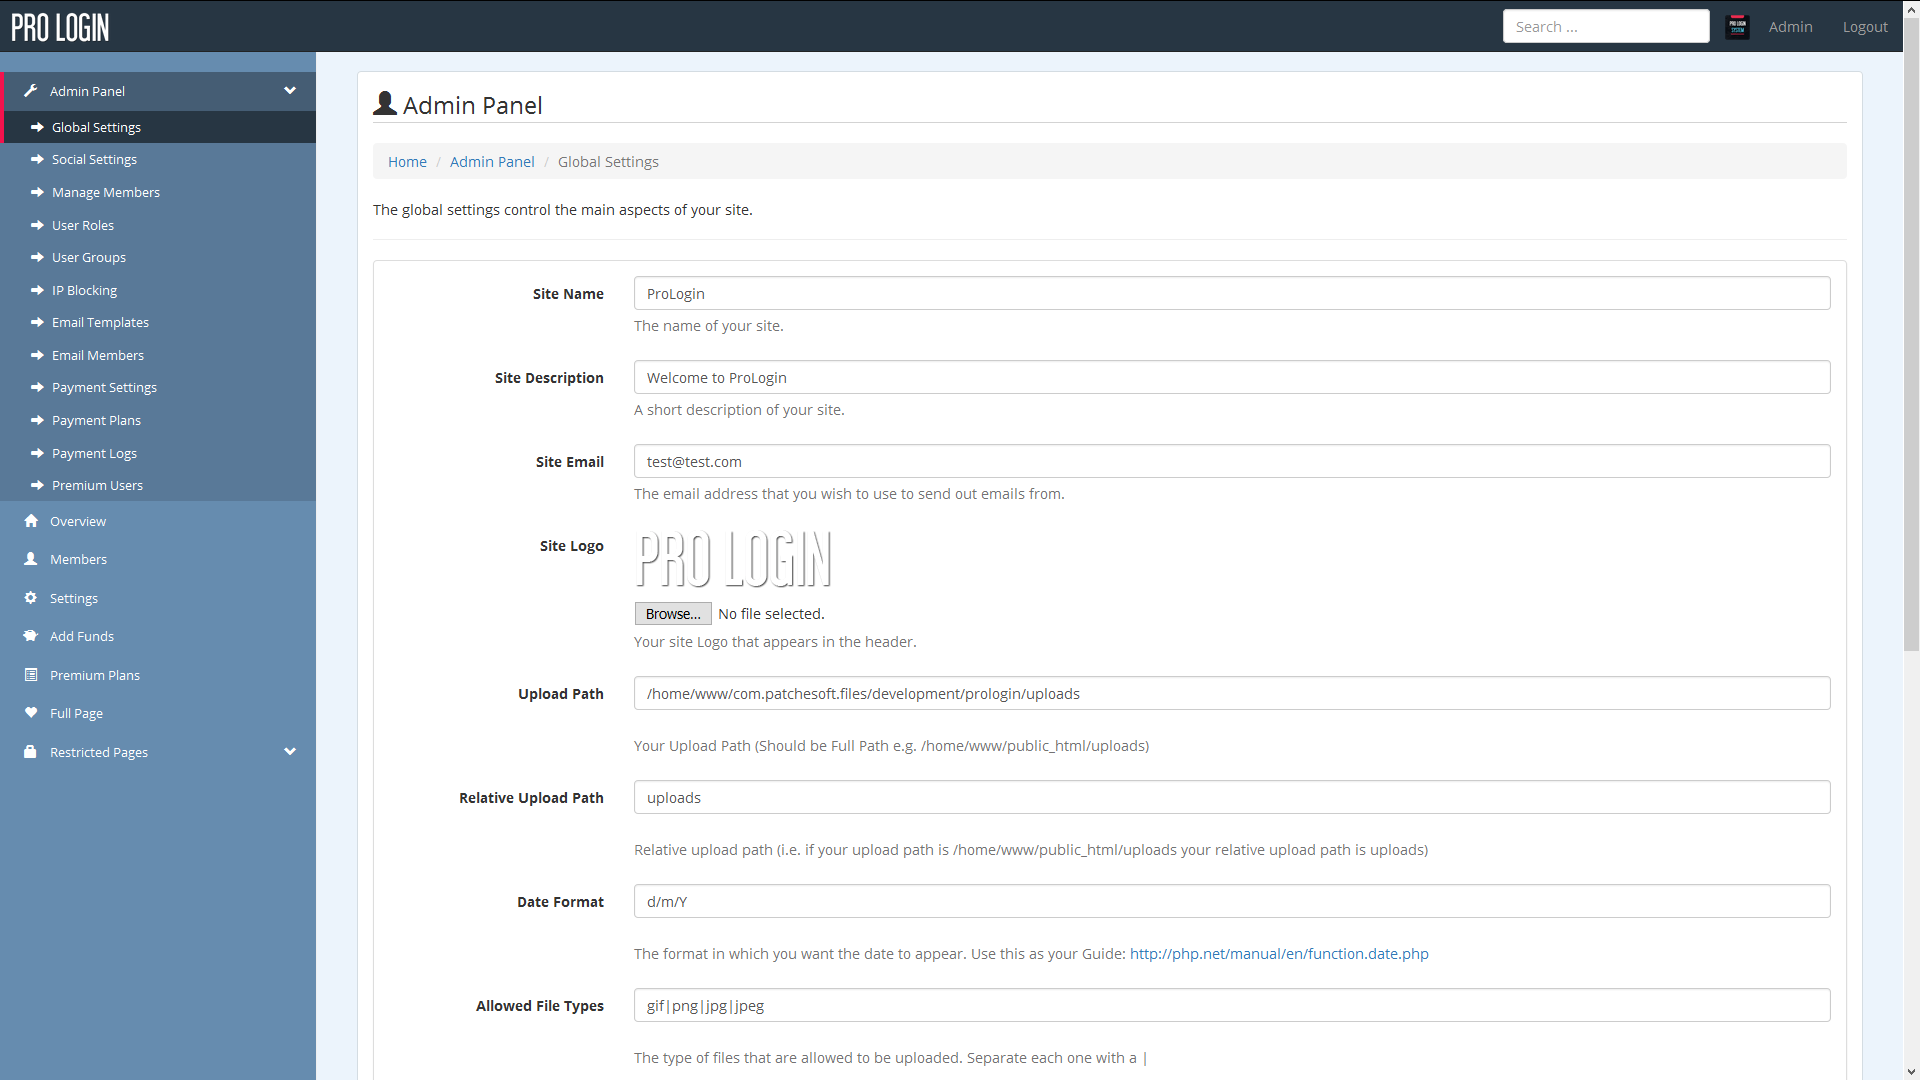
There are quite a lot of options for the Admin Panel that help running your site that much easier. The first set of options is the Global Settings option. These options directly effect the site overall. Here you can change the Site Name, Logo, Disable Registration and more.
Other settings include Social Settings. These settings refer to allowing users to login to your site using their Social Network Accounts. You will need to obtain API keys from the Social Networks, you can do this quite easily and for free. Just follow our Social Network guide that is contained within the documentation folder.

The Manage Member section is similar to the Members page. However, this section contains a bit more detail about your users, including their Email Address and the IP address used to sign up with the account. From this page, you can also Edit and Delete members. Clicking on Edit will present you with a page allowing you to edit the user's details, such as username, email and password.
User Roles
The system also employs a User Role system. User Roles have certain privliges to various areas of the site and you can create custom User Roles for your users.
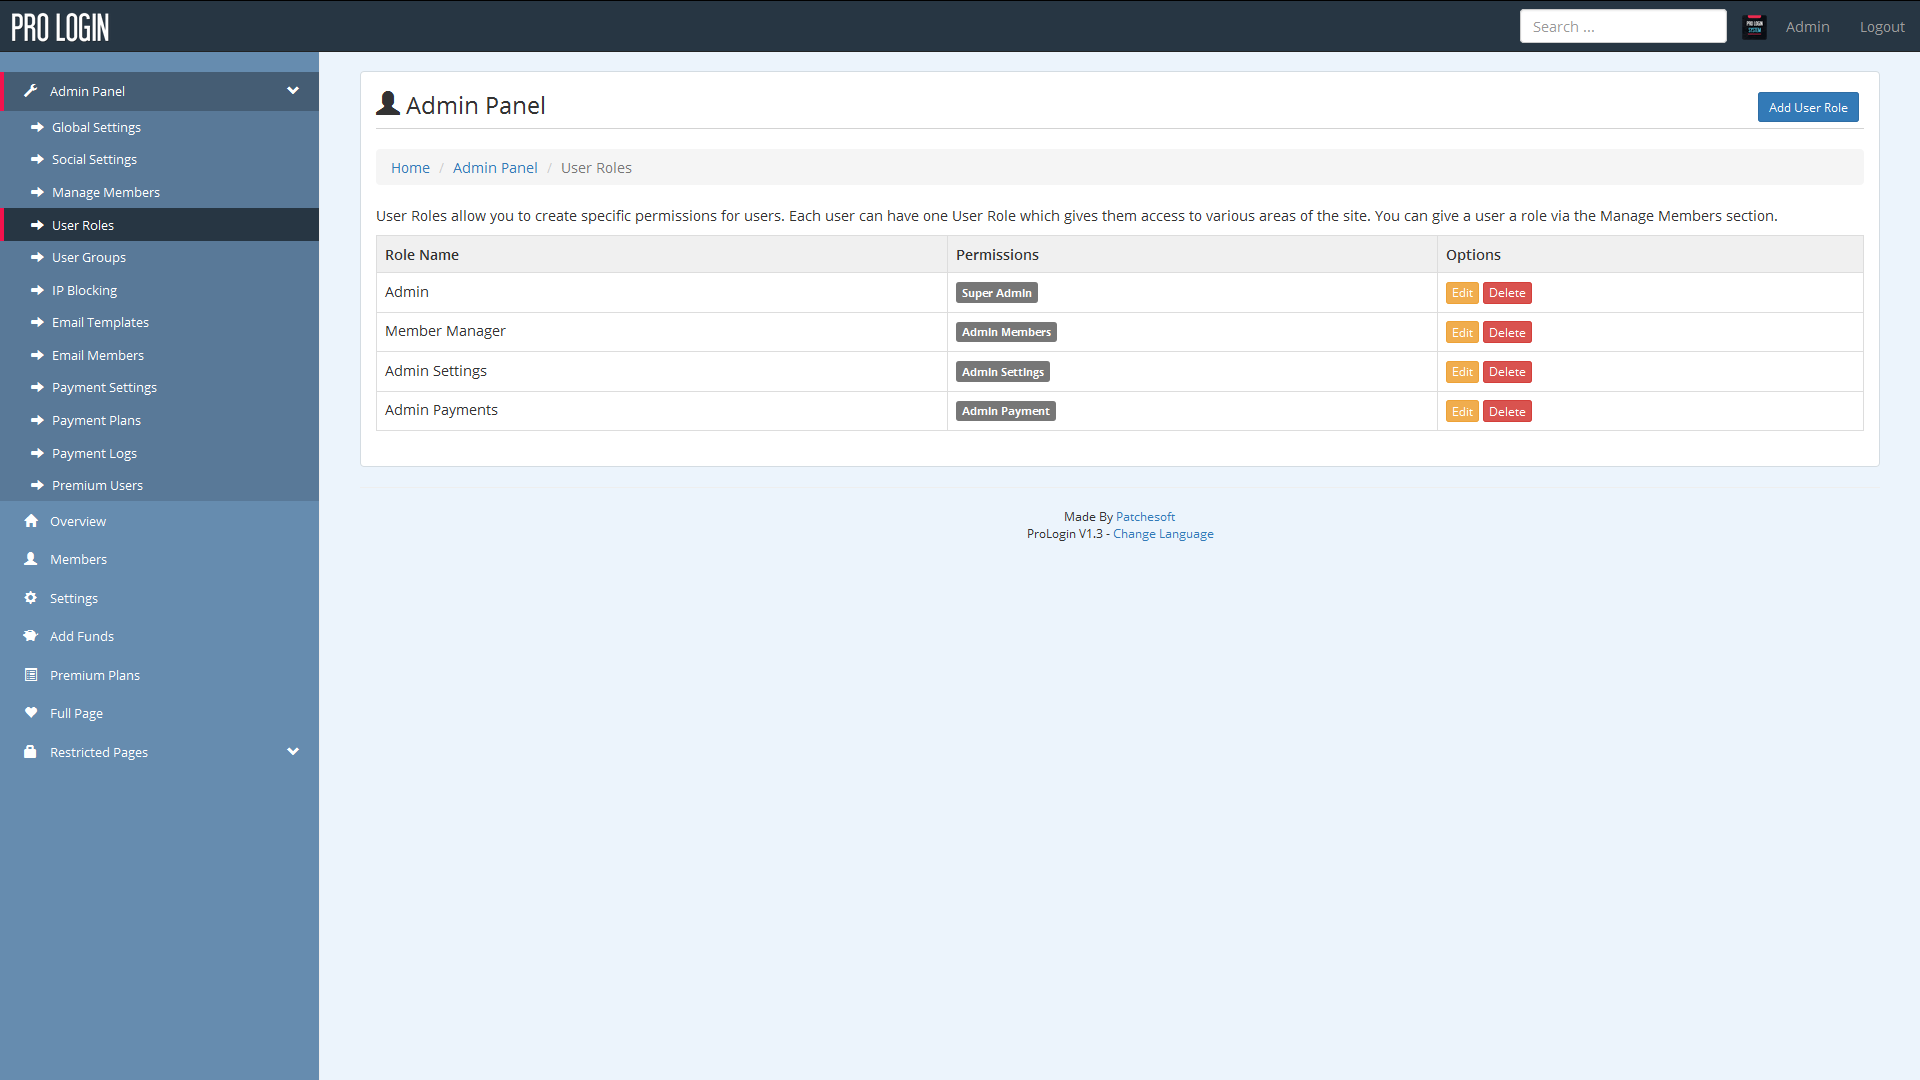
Defined User Roles:
- Admin - complete access to every part of the site
- Member Manager - access to the Admin Panel's Manage Members section
- Admin Settings - access to the global settings and social settings pages
- Admin Payment - access to the payment settings in the Admin Panel
You can create custom roles which incorporate two or three of these roles such as:
CUSTOM ROLE NAME: User Moderator
ROLES: Member Manager, Admin Payment
Then if a user has the User Moderator User Role, they would be able to manage the member section in the admin panel and the admin payment settings areas.
Groups
Another option included in the software is User Groups. This section allows you to create groups for your users, allowing you to keep them more organised. You can also use groups to restrict access to certain pages. We have made a test page for this and you can view the coding behind it by editing the file application/controllers/Test.php.
We also have an in-built IP blocking system. Here you can add IP Address to a blacklist which will prevent those IP addresses from registering new accounts and logging in.
Email Templates allow you to edit Emails that are sent out to users. There is currently only one email you need to be aware of and that is the Forgotten Password email. If you wish to change this email and the way it's presented, feel free to edit the Email using this area.
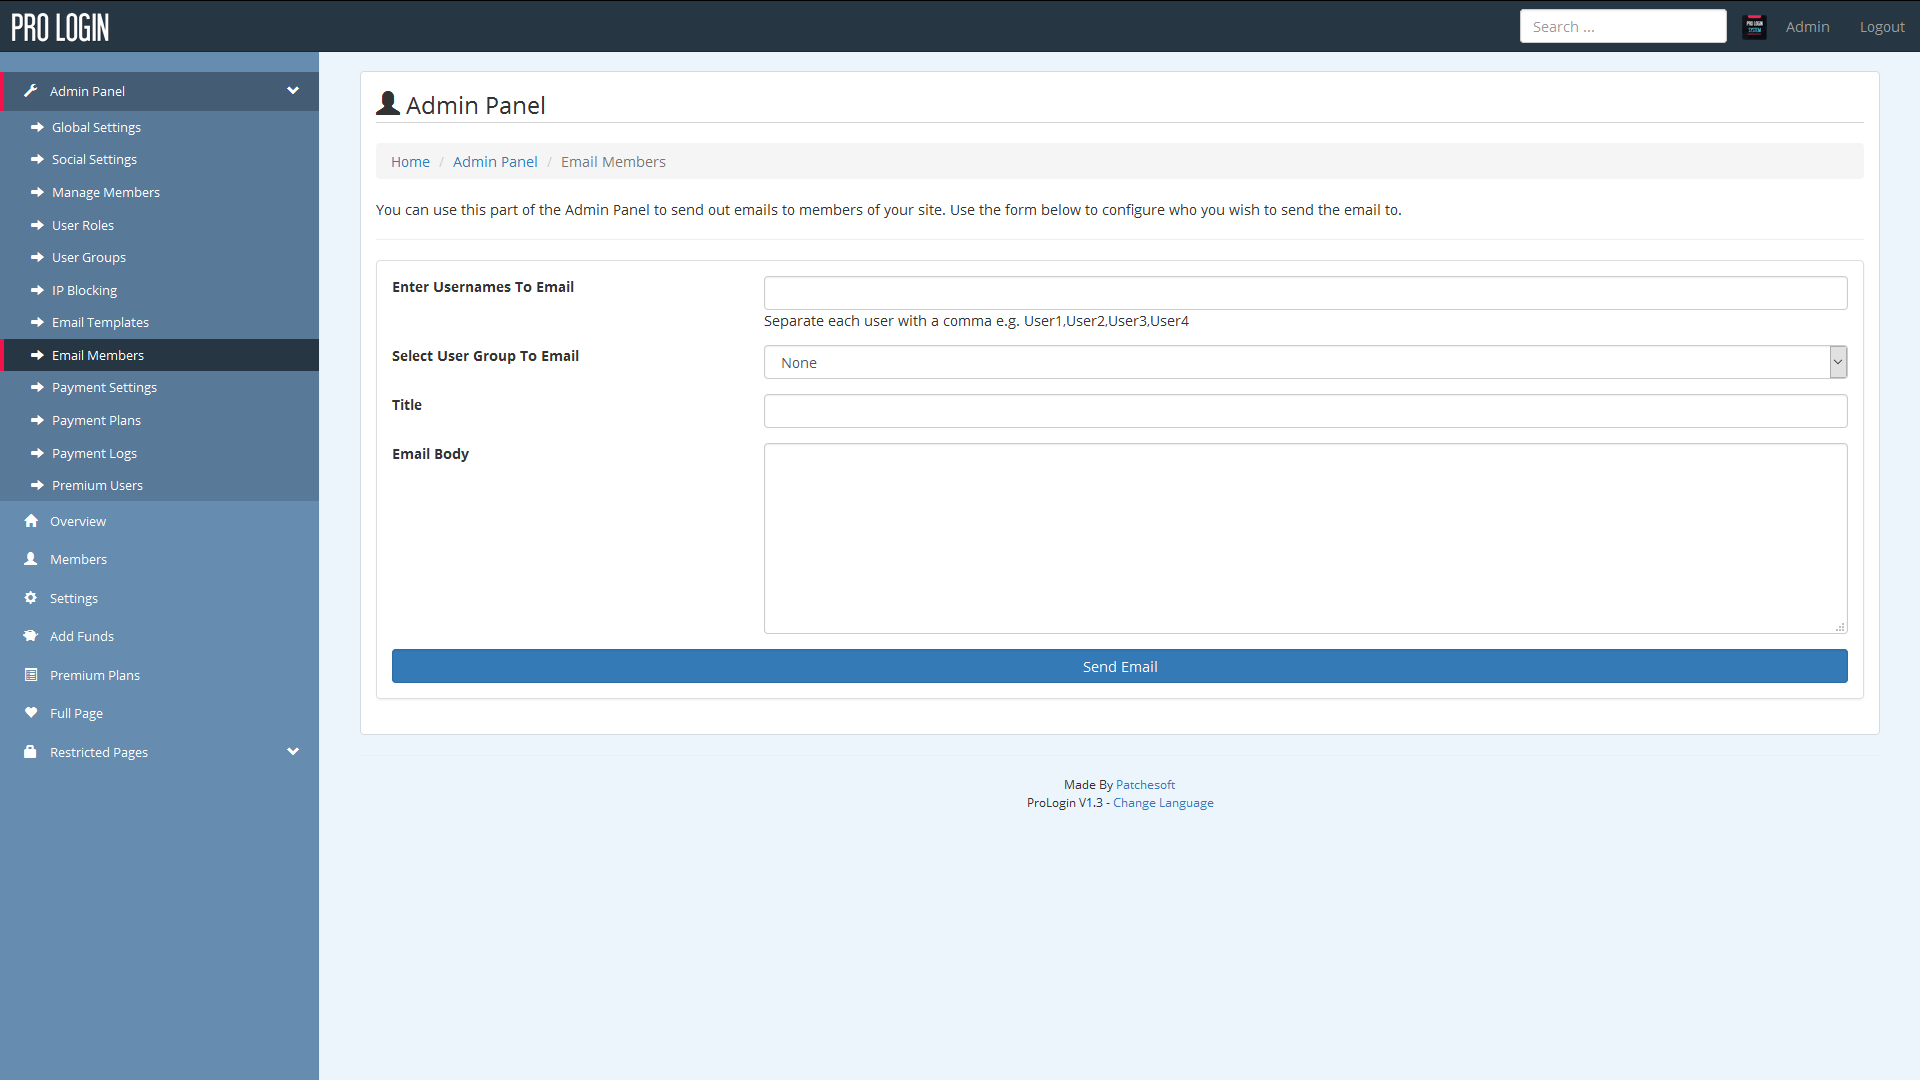
In the Admin Panel is also the ability to send out emails to your members. From the Email Members page, you can select individual users, user groups or all users. Then you can set the title of the email and of course, the email message you wish to send. Emails are sent using CodeIgniters in built email library. You can change the settings for how emails are sent using the email config found here: application/config/email.php.
Creating Your Own Content - top
If you want to add your own custom code to the system, follow this guide. This guide is only if you wish to add pages/content/features using PHP.
Creating your own pages in PHP requires you to use the CodeIgniter framework. It's quite simple to use if you have some programming experience. You can view our test content file here: application/controllers/Test.php
To create a page, first you will want to create a Controller file. This file will be where you main PHP code logic goes. Below is an example controller file. The file must be saved as the same name as the class (with a captial letter). So for example, the class here is called Example, so the controller file must be called Example.php. The file must be placed inside the application/controllers/ folder.
<?php if ( ! defined('BASEPATH')) exit('No direct script access allowed');

class Example extends CI_Controller
{

	public function __construct()
	{
		parent::__construct();
		$this->load->model("user_model");
		if(!$this->user->loggedin) {
			redirect(site_url("login"));
		}
	}

	public function index()
	{
		$this->template->loadContent("example/index.php", array(
			)
		);
	}
}

?>
The name of the Controller is also used to access the page. Since we named our controller Example, we can now access it using our URL like so: http://www.mysite.com/example/
There are a few more things to look at here too. If you notice inside the index() function, there is this line:
$this->template->loadContent("example/index.php", array(
			)
		);
This line is saying to load the HTML file stored in application/views/example/index.php. If you want to create your own HTML files, you can. Simply create a folder inside the application/views/ folder. Name it whatever you like. For this example, let's call it example. Inside that folder, create your very own PHP file that will be used to display the HTML. Let's create a file called test.php and put some code inside it:
Hello, this is a test! We save it as a .php file so that we can also include PHP code. Like this:
Now, we need to edit our controller file application/controllers/Example.php to use our new HTML file that we just created. So edit the loadContent() function to use it, like so:
$this->template->loadContent("example/test.php", array(
			)
		);
Now when you load the Example page, it will display the content inside application/views/example/test.php.
If you found that confusing, not to worry! There are thousands of guides out there that use the CodeIgniter framework. There is also the CodeIgniter Documentation, which gives a brilliant easy to understand overview of how to use the system. Don't forget to look at our own test file, which gives examples of how you can restrict access to pages (application/controllers/Test.php). You can also contact us via email if you need extra help.
CodeIgniter User Guide: http://www.codeigniter.com/user_guide/
Modifying the HTML & CSS - top
You can modify the HTML and CSS of the product to match the look and feel of your website. You can manually edit the CSS files that control the site's look and feel.
You can find the CSS file in styles/main.css. Here you will be able to see the current rules that have been created for the site. You may want to put your own rules at the bottom of the file, or even create your own CSS file and include that into the site layout. This will be useful should you ever wish to upgrade the product with a newer version and your settings won't be overwritten.
You may also wish to change the HTML of the site. All HTML files are inside the application/views/ folders. The layout HTML file can be found in application/views/layout/layout.php. This file is the core of the site structure. There are some PHP coding inside the HTML files which is used to generate the dynamic content; we suggest not modifying these as it could cause unexpected errors in your system.
Remember, you can find out more information on how to use Views, Controllers and Models using the CodeIgniter framework by reading their documentation: http://www.codeigniter.com/user_guide/
Login Protect Pages - top
If you have some website pages outside of the system, you can include a small script into your file to make it so that users must be logged in to view it. Here's a detailed guide on how to do it.
1) Identify what files you want to be login protected. The files need to be PHP files, so if you have any HTML files you'll need to rename them with .php extensions. For example, about-us.html becomes about-us.php. The reason is so that the login protect script can check for a logged in user. It cannot do this on a regular HTML page.
2) Once you have the file, you'll need to locate two files in your download file. Open up zip/extra/login_checker/ and you should see two files: index_check.php and login_checker.php.
3) You need to place index_check.php inside the root directory of your system (where the application, system and images folders are).
4) Next you need to open up your file that you want to protect and insert the code from login_checker.php into the top of the file. For example:
My page
Hello welcome to my page!
Becomes:
    /* Login Checker Script */

    /*

        This script can be used in your other files to check to make sure a user

        is logged in.
You just need to make sure that the file you add this script to is a
PHP file. If you have a HTML file, you can simply rename it with the
.php extension.
If you include this file from another directory, you'll need to uncomment
the $system_path and $application_folder lines.
*/
ob_start();
define("REQUEST", "external");
/* Directory paths
Only change these if your files are outside the original directory
of the application. Use for each folder you are out by.
By default, it uses the original CodeIgniter values.
*/
// $system_path = "prologin/system";
// $application_folder = "prologin/application";
include('prologin/index_check.php');
ob_end_clean();
$CI =& get_instance();
if(!$CI->user->loggedin) {
redirect(site_url("login"));
}
?>
My pageHello welcome to my page!
If your external file is outside of the system directory, you'll need to un-comment two variables in the php code:
  $system_path = "prologin/system";
  $application_folder = "prologin/application";
And rename prologin to the folder in which the software is in.
Save the file and now whenever a user visits your page, the user will be automatically redirected to the login page if they are not already logged in. This allows you to protect many areas of your site and give access to your members.
Remember, if you need help setting this up, feel free to send in a Support Request!
Languages - top
If you would like to translate your product into another language, then you can do so by modifying the language files. Follow the simple steps below to get started:
- Create a new folder inside the application/language/ folder. Give the folder the name of your language, such as spanish, italian etc. For this example, I will call mine french.
- Copy the 3 files from inside application/language/english/ to the newly created folder that you just made.
- Inside your new language folder you should now have a content_lang.php, error_lang.php and success_lang.php. You can also add the index.html file too.
You are now ready to begin editting these files.
The content_lang.php contains all translations for most of the content pages on the site. The error_lang.php file contains all the error messages that are given to users when they do something wrong. You are free to translate them all or just a few. The main one should be the content_lang.php as those translations are the ones your users will mostly see.
To edit the translations, all you need to do is type the new correct text inside the double quotes. For example, the following is a couple of lines from the content_lang.php file:
			$lang['ctn_3'] = "Provide Us Feedback";
			$lang['ctn_4'] = "Email Address";
To translate, you just need to modify the text within the double quotes. For example, a french translation would be:
			$lang['ctn_3'] = "Fournir nous Commentaires";
			$lang['ctn_4'] = "Adresse e-mail";
Save the file when your done. The final step for your translations to take place, you need to edit the application/config/config.php file. Change the following line:
$config['language'] = 'english';
to the name of the folder that you stored your new language files in. In my case, it was french, so I change it to:
$config['language'] = 'french';
Save config.php and you should see your new translations take place.
Extra
You may also need to add the System translation files. These files are for generic System errors. We recommend performing the following steps:
You need to create a folder in your Systems language folder for your new language. The folder name needs to be the same name as your new language. In the example below, it's "spanish". Please follow these steps:
- 1) Create a folder inside system/language/ called spanish
- 2) Locate the following folder: system/language/english/
- 3) Copy all the files inside this folder to your newly created folder (system/language/spanish/)
Dynamic/Multiple Languages
This software also has the option for the user to change the language themselves. The available languages are based on the translations you have done. A user can change the language of the site by clicking the Change Language link in the footer of the site.
You can add as many available languages are you like. You just need to make sure you have created the language files and folders, as outlined in the guide above.
To make a language available for selection, you need to edit the main config file: application/config/config.php. Look for this line:
			$config['available_languages'] = array(
	          "english" => array(
		      "display_name" => "English",
		      "rtl_support" => 0
	          )
            );
This is where you need to add your other languages. For example, to add your French language, edit the code so it says:
			$config['available_languages'] = array(
	          "english" => array(
		      "display_name" => "English",
		      "rtl_support" => 0
	          ),
              "french" => array(
		      "display_name" => "French",
		      "rtl_support" => 0
	          )
            );
Now when the user visits the Change Language page, the option for French will appear in the menu. Remember, make sure the language files (in this case French) have been added too as outlined in the Language Guide above.
RTL-SUPPORT: If you need to enable right-to-left text, for your language you need to change "rtl_support" => 0 to "rtl_support" => 1. This will then set the page to change text to RTL.
PayPal Setup - top
Welcome to the Setup Paypal Guide. This guide is used to setup your PayPal account so that you can use the micro-transactions feature on the software.
In order to do this, you first need a PayPal account and have installed the software. Login to your system as the admin and go to Payment Settings option in the Admin Panel.
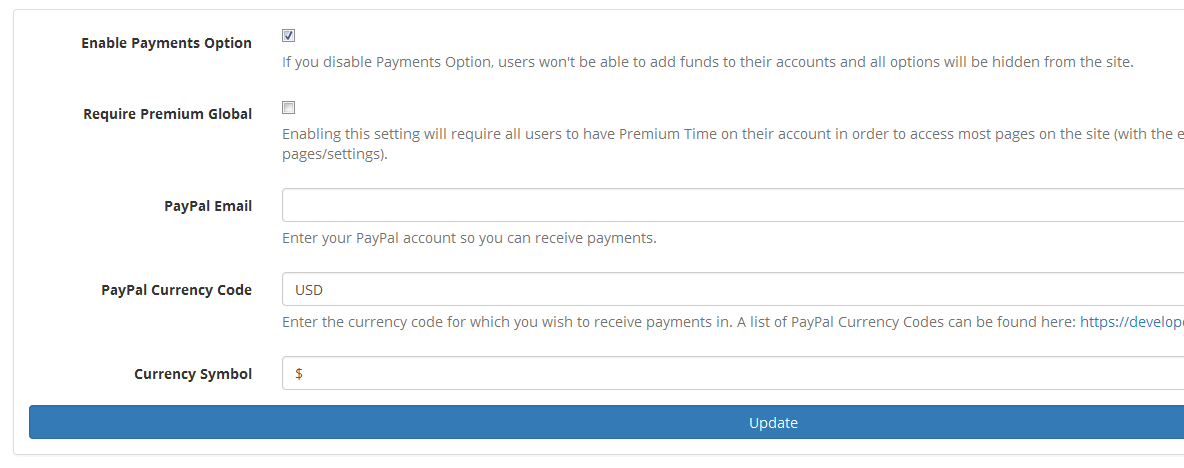
Enter your PayPal account email in the PayPal Email field. Whenever someone tries to buy funds, this is the account that has the money deposited into.
PayPal IPN Setup
Now you need to go to PayPal.com and turn on your IPN. IPN stands for the Instant Payment Notification system and it is used to automatically add the credits to user accounts when they purchase them (making it so you don't have to manually give each user the credits yourself.).
First login to your Paypal account. Click on the Profile link in the top-right corner and navigate to My Profile settings page. You should see a host of options in the left sidebar now.
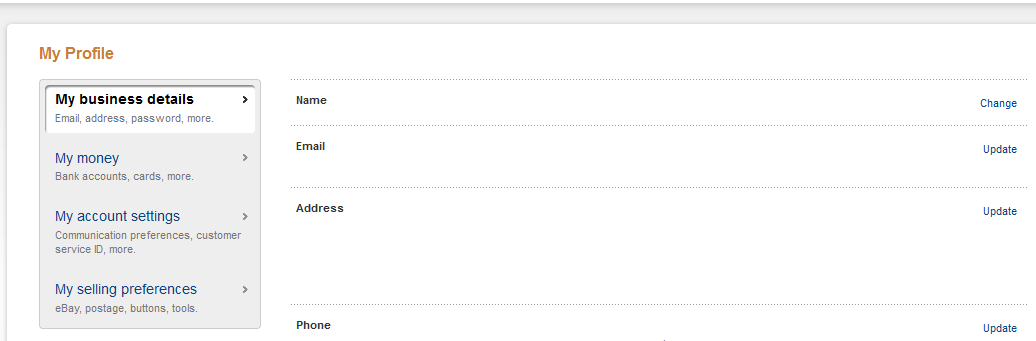
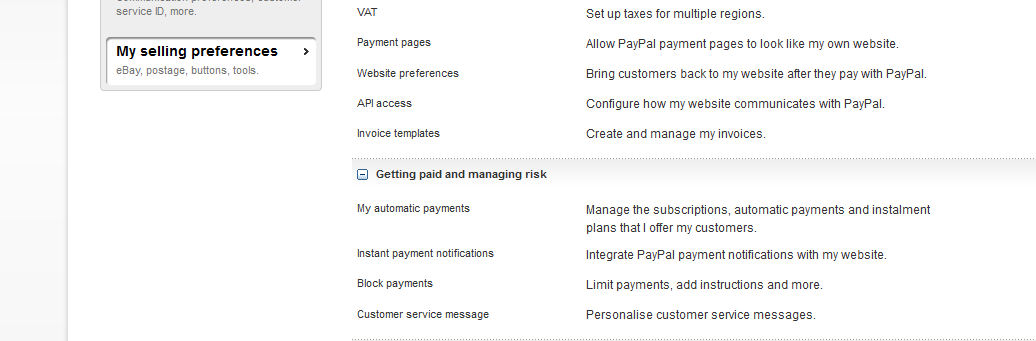
click on the My Selling Preferences and find the Instant Payment Notifications Update link.
Now you need to enable and turn on IPN messages. In the Notification URL you need to enter the domain name you are using to host the system along with: IPN/process2. So if I had installed the software on http://framework.patchesoft.com/ my URL would be: http://framework.patchesoft.com/IPN/process2
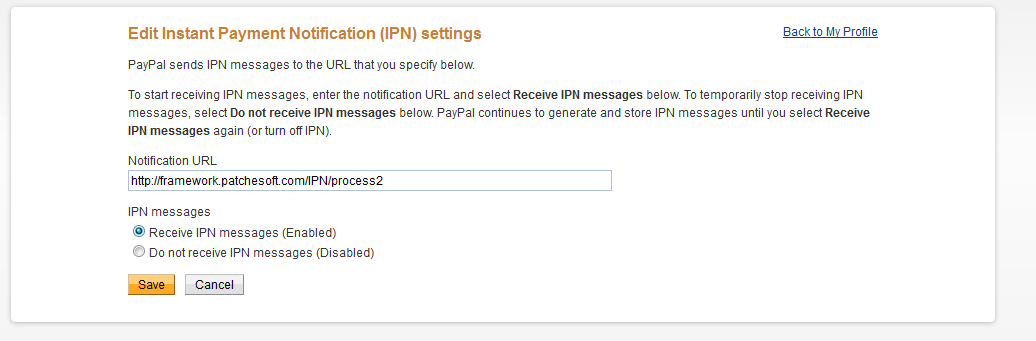
Save the settings. Once done, you should now be able to receive payments and your users should automatically be receiving their funds. If you're having issues, try checking the IPN History page in PayPal which shows any requests it is trying to send out, along with any error messages/issues: https://www.paypal.com/uk/cgi-bin/webscr?cmd=_display-ipns-history
Social Media Login Setup - top
This software allows for users to login to the system via Twitter, Facebook and Google. This guide aims to help you activate this feature. You can disable Social Logins via the Admin Panel. In order for the social login to work, you need to add the correct Social Network keys to your admin area. This guide will show you where you can obtain these keys and where they need to go. Users that login via Social Networks just have to click the Login With Twitter/Facebook/Google buttons and the System will connect to the social network to obtain their user information and log them into the system. All the user has to do is click and it allows them to use the System without having to enter lots of information on the registration page
In order to implement the Twitter Social Login, you will need to get the following information:
- Twitter Consumer Key
- Twitter Consumer Secret
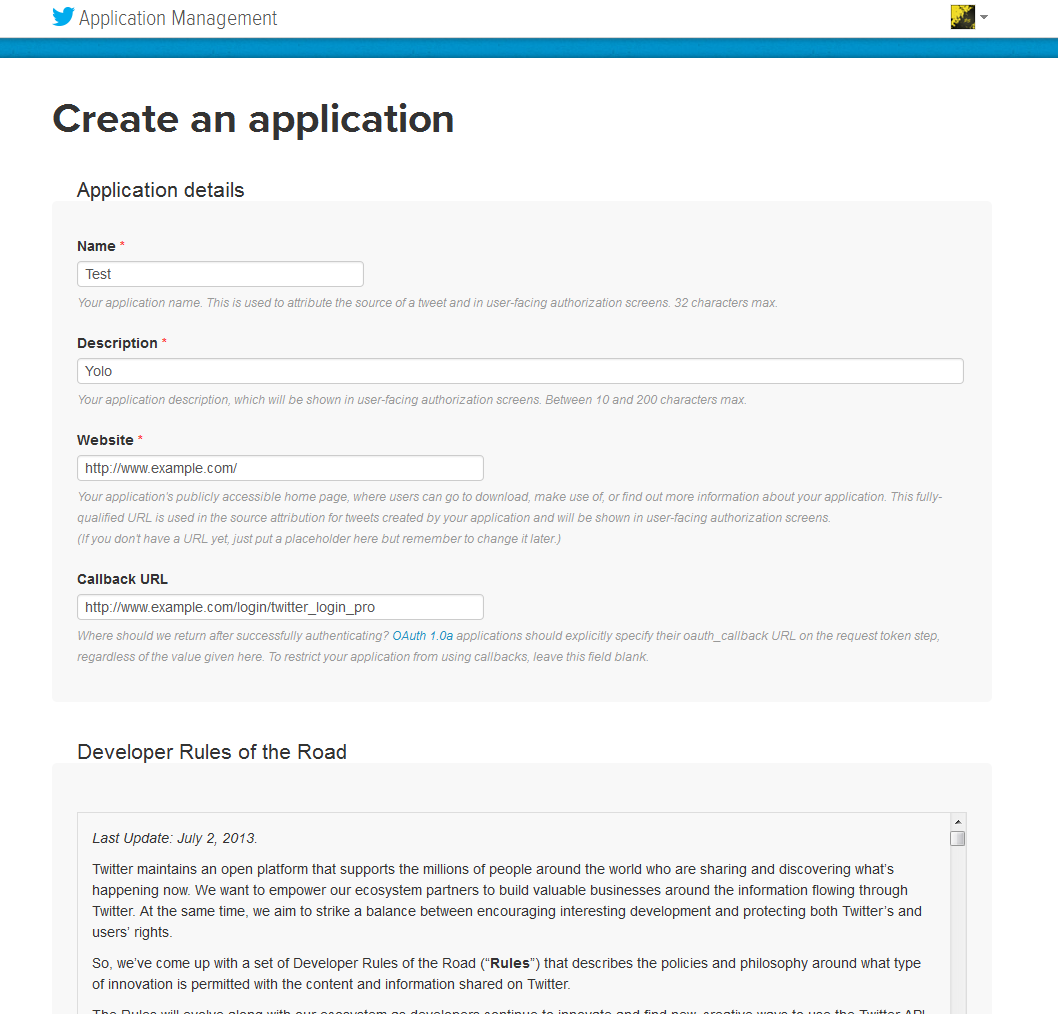
To get this information, you need to create your own App at the Twitter Developer's website: https://dev.twitter.com/. It's free to do and easy to setup.
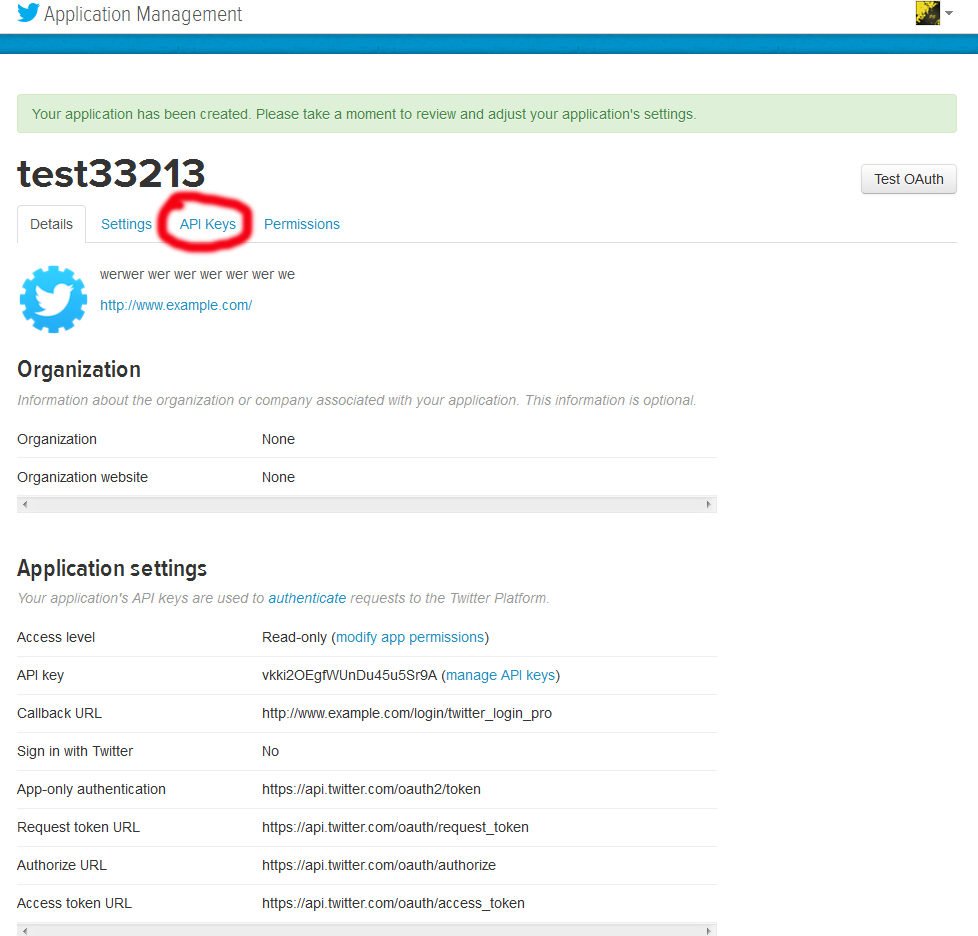
First you will want to head to the Twitter Developer site and login using your Twitter Account. Once your logged in, head over to https://apps.twitter.com/. Click the Create New App button in the right corner.

Next you want to fill out your App Information. In the Callback URL field, you want to enter your website URL followed by /login/twitter_login_pro; so if your website URL was http://www.patchesoft.com, the URL you would enter would be http://www.patchesoft.com/login/twitter_login_pro
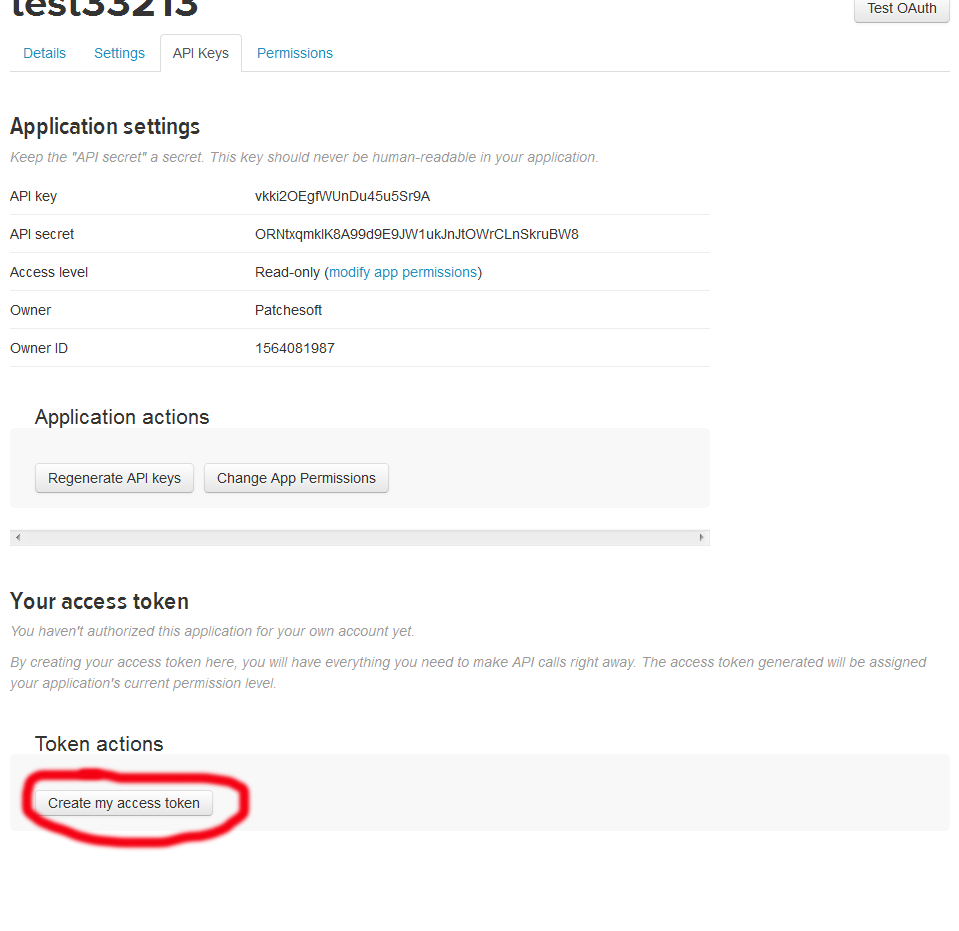
Once created, click on the API tab.
On the API Tab, scroll to the bottom to find the Create My Access Token button. Click it. Your tokens will then be generated; it may take a few minutes for them to appear on the page. Just refresh every couple of minutes until you come to a page like the one below.
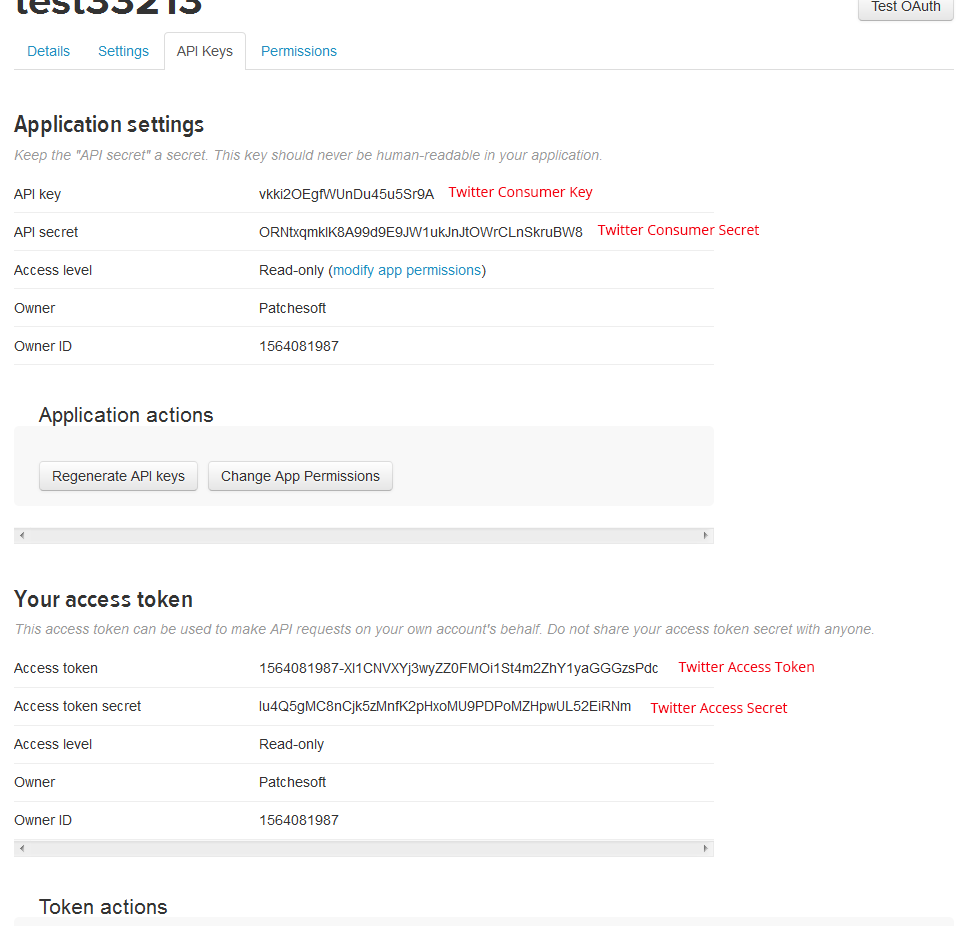
Now click on Keys And Access Tokens tab. Now you need to enter the keys from your app into the Admin Panel of your System. You can find the Twitter Settings under the Social Settings link.
In order to implement the Facebook Social Login, you will need to get the following information:
- Facebook APP ID
- Facebook APP Secret
To get this information, you need to create your own Facebook App at the Facebook Developer's website: https://developers.facebook.com/
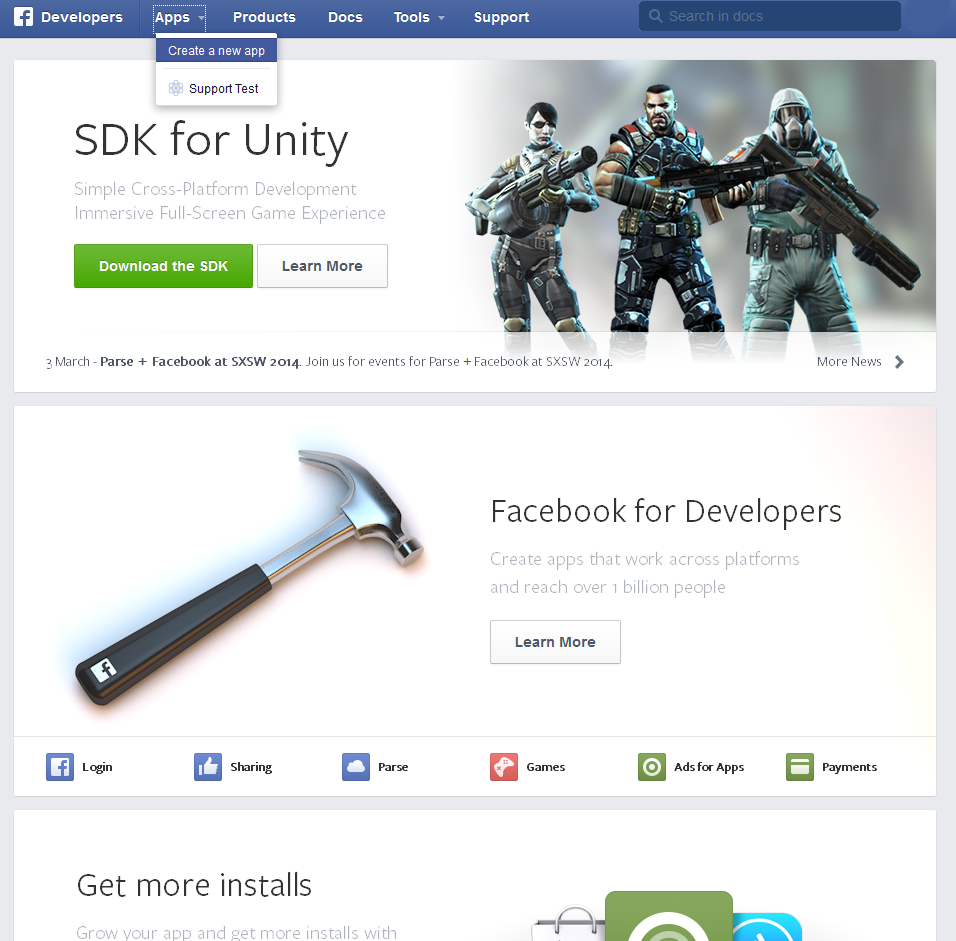
Click on the APPs tab and select Create a new app
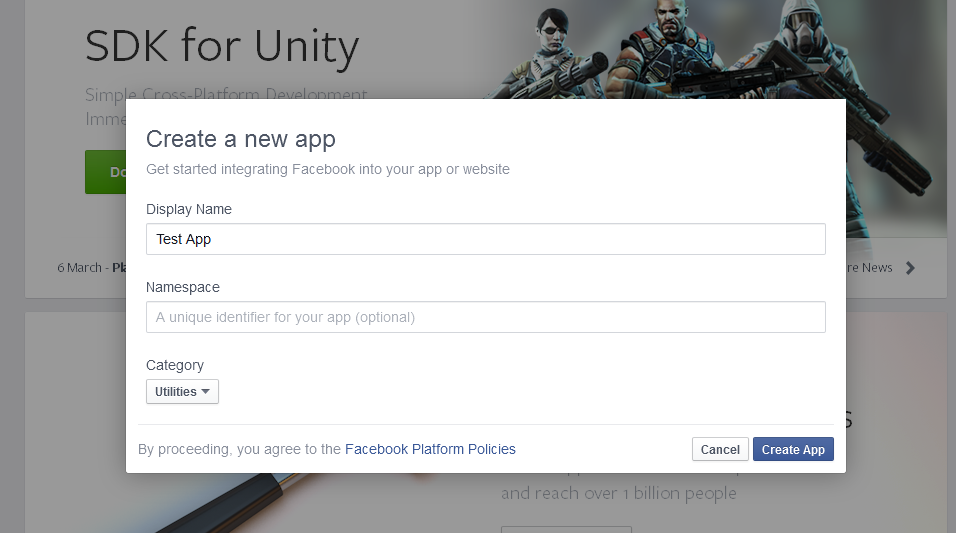
Give your App a name. You can ignore the namespace field. Select a category and then hit the Create button.
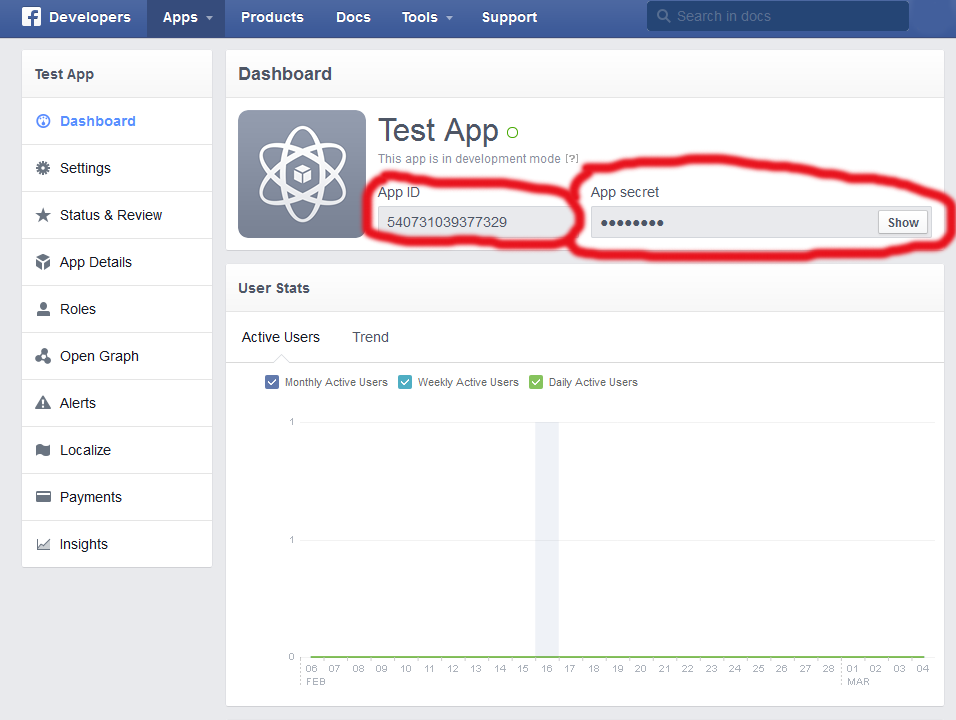
On the above page you will be able to get your Facebook APP ID and Facebook APP Secret. Then you need to add them to the System in the Admin Panel. You can find the Facebook Keys under the Social Media Tab.
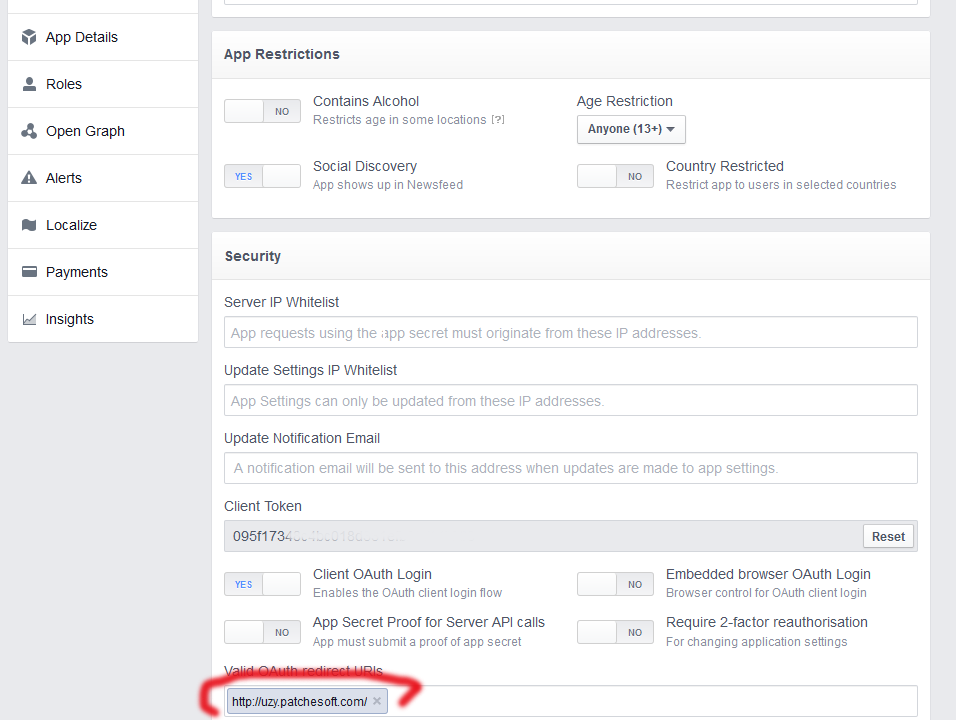
The final step is to click on the Settings tab on the Facebook Developers page and then click the Advanced Top Tab. Scroll to the bottom and find the Valid OAuth redirect URIs and add in your websites URL as shown above.
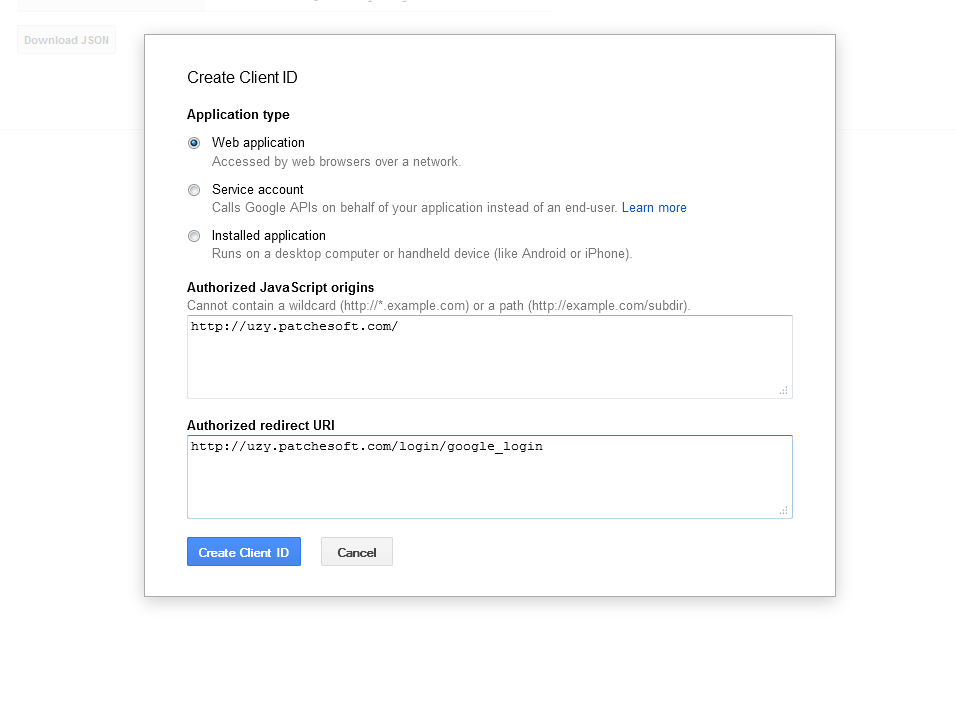
In order to implement the Google Social Login, you will need to get the following information:
- Google Client ID
- Google Client Secret
To get this information, you need to create your own Google App at the Google Developer's website: https://console.developers.google.com
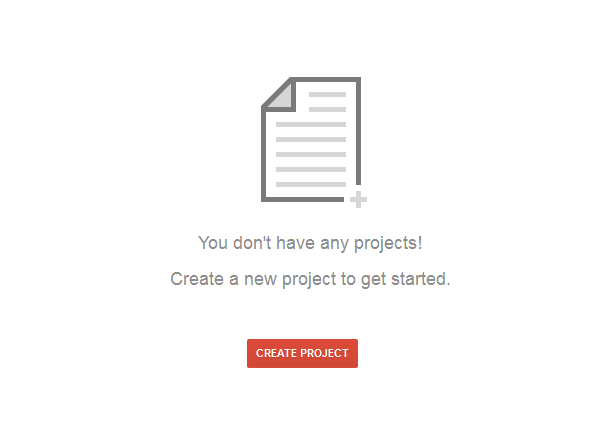
Click Create A Project. Give your project a name and Accept the Terms Of Use.

Next click on the API & Auths tab and then the Credentials Tab. Click on the Create New Client ID button and fill in your information. For the Authorized redirect URI enter your domain name followed by /login/google_login so for example: http://www.example.com/login/google_login. For the Authorized JavaScript origins just enter your website's URL.
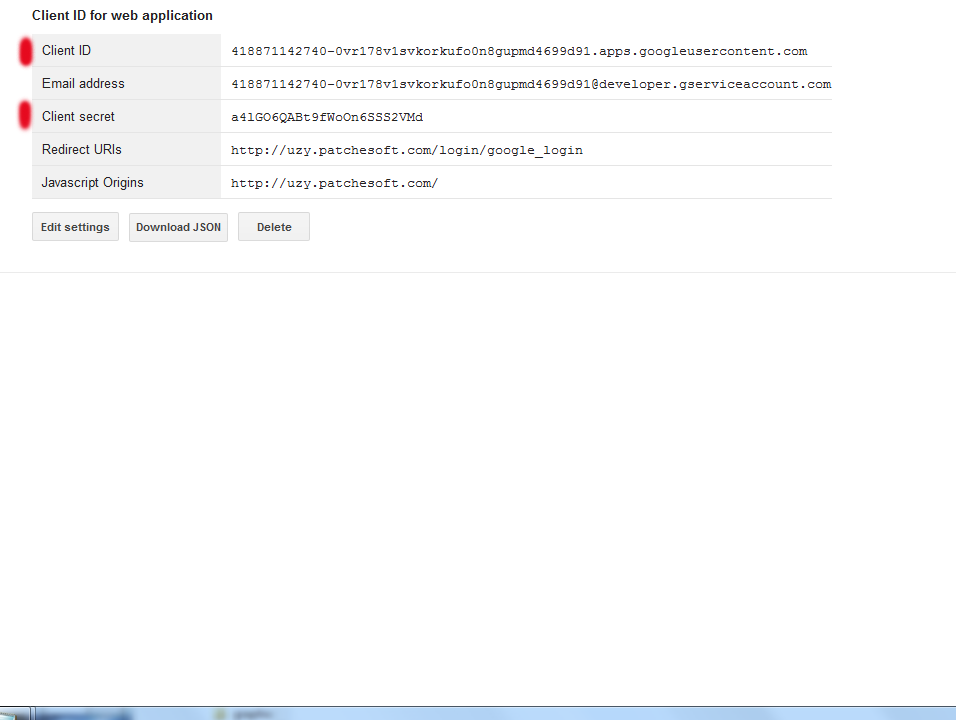
Once created you will find your Client ID and Client Secret values.
The final step is to make sure the Google+ API setting is set to ON. Check out the scrrenshot below.
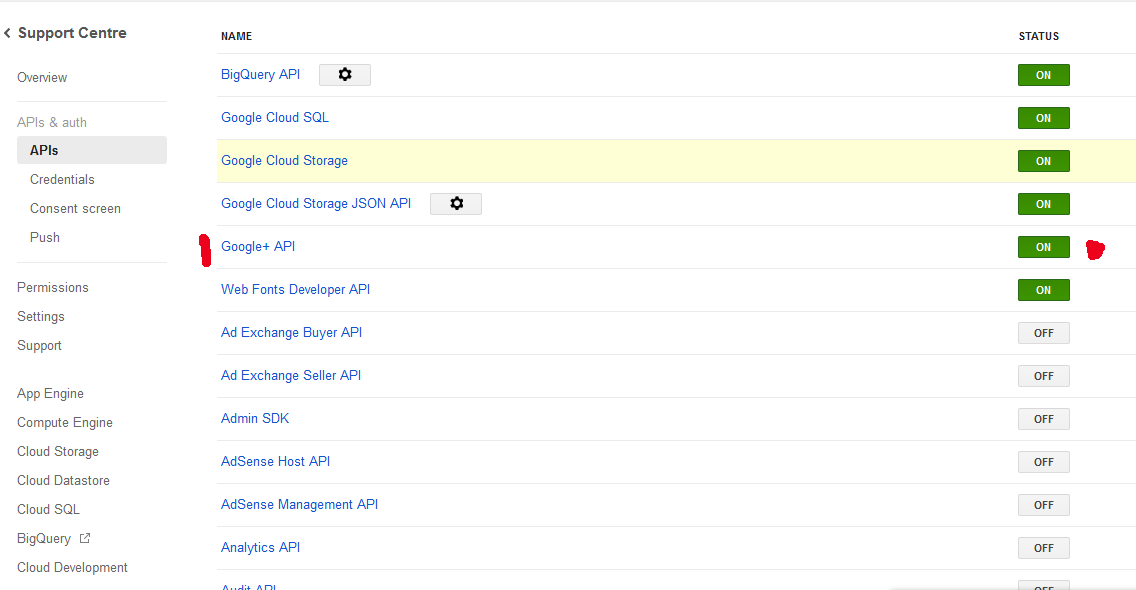
Now you have both keys and can add them to the System. Go to the Admin Panel and locate the Social Media Link to find the place where to insert the keys.
Update Log - top
Welcome to the Update Guide. This guide is to help you update your system to the latest version. We know that a lot of our customers do their own custom updates to their systems and so having to overwrite their files all the time can sometimes cause them problems. This update guide is to show you which files need to be updated in order for your system to be fully updated.
BEFORE UPDATING, PLEASE MAKE A BACKUP OF YOUR EXISTING FILES/DATABASE! SOME UPDATES WILL OVERWRITE/DELETE OLD DATA THAT MAY BE USEFUL TO YOU!
Version 2.1 (Released 30/04/2019)
This update includes new features and bug fixes. The following changes/updates were made:
- Updated to the latest version of CodeIgniter 3.1.10
- Fixed bug with registration and captcha
- Added new Invite System
- You can create Invite Codes in the Admin Panel that allow users to sign up. Codes can expire after use, after X amount of hours or be unlimited use.
In order to update, please overwrite the following files in Updates/version2.1/files/ in the download file.
DATABASE UPDATE
This update contains a change to the database tables. In order to make the system work, you will need to execute the update.sql found in updates/version2.1/sql/update.sql.
Just import this file into your database manager (like phpMyAdmin) and it should update your database tables for you.
LANGUAGE UPDATE
For those who have up-to-date language files, you will need to add some new lines to your language files in order to translate the new content being added. Follow the simple edits below:
Modify file application/language/english/content_lang.php (or replace english with the name of your language folder)
Add the following lines of code to the bottom of your language file
// 2.1
$lang['ctn_486'] = "Invites";
$lang['ctn_487'] = "Status";
$lang['ctn_488'] = "Code";
$lang['ctn_489'] = "Registered";
$lang['ctn_490'] = "Created";
$lang['ctn_491'] = "Add Invite";
$lang['ctn_492'] = "Leave blank if you don't want to email this invite to anyone.";
$lang['ctn_493'] = "Invite Expires (hours)";
$lang['ctn_494'] = "The amount of hours the invite will expire in (become invalid). Enter 0 for this invite not to expire.";
$lang['ctn_495'] = "Expire Upon Use";
$lang['ctn_496'] = "If checked, the invite will become invalid once a user has registered using it.";
$lang['ctn_497'] = "Bypass Registration Block";
$lang['ctn_498'] = "If you have registration disabled in the Admin Panel -> Global Settings, check this field to bypass it when using the invite code.";
$lang['ctn_499'] = "Unused";
$lang['ctn_500'] = "Used";
$lang['ctn_501'] = "Expired";
$lang['ctn_502'] = "Member Invite";
Modify file application/language/english/error_lang.php (or replace english with the name of your language folder)
Add the following lines of code to the bottom of your language file
// v2.1
$lang['error_81'] = "Invalid Invite";
$lang['error_82'] = "That invite code has expired!";
Modify file application/language/english/success_lang.php (or replace english with the name of your language folder)
Add the following lines of code to the bottom of your language file
//V2.1
$lang['success_48'] = "Invite was created!";
$lang['success_49'] = "Invite was updated!";
$lang['success_50'] = "Invite was deleted!";
Save the files
CLEAN INSTALL
Remember, if you have trouble updating, you can always do a clean install. Just follow the guide in the Documentation Guide as you did before and you will have the latest version of the system ready.
Version 2.0 (Released 15/08/2018)
This update includes new features and bug fixes. The following changes/updates were made:
- Updated to latest version of codeigniter 3.1.9
- Fixed bug with registering using custom fields
- Added new Welcome Email for newly registered members.
- Added export options to PDF, Excel, Text file for members list, user logs and payment logs in Admin Panel
- Added Cookie Consent Notification Option
- Added Example Privacy Policy
- Changed Image Resize Library to GD2
In order to update to the latest version, please overwrite the following files:
- System
- system/
- Language
- application/languages/english/content_lang.php
- Controllers
- application/controllers/Register.php
- application/controllers/Admin.php
- application/controllers/Login.php
- application/controllers/User_settings.php
- Libraries
- application/libraries/Settings.php
- application/libraries/Template.php
- Views
- application/views/admin/email_templates.php
- application/views/admin/edit_email_template.php
- application/views/admin/members.php
- application/views/admin/user_logs.php
- application/views/admin/payment_logs.php
- application/views/admin/settings.php
- application/views/user_settings/index.php
- application/views/login/privacy.php
- application/views/layout/themes/titan_layout.php
- application/views/layout/themes/layout.php
- application/views/layout/themes/dark_fire_layout.php
- application/views/layout/themes/light_blue_layout.php
- application/views/layout/login_layout.php
- Styles
- styles/elements.css
DATABASE UPDATE
This update contains a change to the database tables. In order to make the system work, you will need to execute the update.sql found in updates/version2.0/sql/update.sql.
Just import this file into your database manager (like phpMyAdmin) and it should update your database tables for you.
LANGUAGE UPDATE
For those who have up-to-date language files, you will need to add some new lines to your language files in order to translate the new content being added. Follow the simple edits below:
Modify file application/language/english/content_lang.php (or replace english with the name of your language folder)
Add the following lines of code to the bottom of your language file
// 2.0
$lang['ctn_474'] = "This is the Subject of the Email when it is sent out (Your site name is appended automatically!)";
$lang['ctn_475'] = "Welcome Email";
$lang['ctn_476'] = "Copy";
$lang['ctn_477'] = "CSV";
$lang['ctn_478'] = "Excel";
$lang['ctn_479'] = "PDF";
$lang['ctn_480'] = "Print";
$lang['ctn_481'] = "Privacy Policy";
$lang['ctn_482'] = "Okay, got it!";
$lang['ctn_483'] = "By using this site, you consent to use of Cookies. For more information, read our";
$lang['ctn_484'] = "Enable Accept Cookies Notification";
$lang['ctn_485'] = "If enabled, a notification will show on every page notifying the user about the use of cookies. The user can then click a button to make it disappear.";
Save the files
CLEAN INSTALL
Remember, if you have trouble updating, you can always do a clean install. Just follow the guide in the Documentation Guide as you did before and you will have the latest version of the system ready.
Version 1.9 (Released 13/11/2017)
This update includes new features and bug fixes. The following changes/updates were made:
- Updated to latest version of CodeIgniter 3.1.6
- User can now logout even if they don't choose a username
- Fixed issue with Google Login
- Updated Facebook SDK
- User is now deleted from User Group when the User is deleted from the system
- Added dropdown menu when you click on your avatar in top nav bar.
- Added list of Online Members to Members List
- Added Online Count to bottom of layout; can update by running cron (see documentation)
- Added option to Global Settings that allow you to resize avatar uploads
- Added new User Logs to the system (logs every action)
- User Log page in Admin allows Admin to view all logs
- Fixed bug with selecting email template language
- Completely redesigned Login/Register pages, with AJAX error checking.
- Fixed issue with row count when searching
In order to update to the latest version, please overwrite the following files:
- System
- /System
- Libraries
- application/libraries/Settings.php
- application/libraries/User.php
- application/libraries/Lib_filter.php
- application/libraries/Datatables.php
- Controllers
- application/controllers/Login.php
- application/controllers/Admin.php
- application/controllers/Members.php
- application/controllers/Funds.php
- application/controllers/Cron.php
- application/controllers/Profile.php
- application/controllers/Register.php
- application/controllers/User_settings.php
- Third Party
- application/third_party/Facebook/*
- Models
- application/models/User_model.php
- application/models/Admin_model.php
- Styles
- styles/elements.css
- styles/login_layout.css
- Views
- application/views/layout/themes/titan_layout.php
- application/views/layout/themes/layout.php
- application/views/layout/themes/light_blue_layout.php
- application/views/layout/themes/dark_fire_layout.php
- application/views/layout/sidebar_links.php
- application/views/layout/mobile_links.php
- application/views/layout/login_layout.php
- application/views/members/index.php
- application/views/admin/settings.php
- application/views/admin/user_logs.php
- application/views/admin/edit_email_template.php
- application/views/user_settings/index.php
- application/views/login/*
- application/views/register/*
- application/views/home/ajax_notification.php
- Languages
- application/languages/english/content_lang.php
DATABASE UPDATE
This update contains a change to the database tables. In order to make the system work, you will need to execute the update.sql found in updates/version1.9/sql/update.sql.
Just import this file into your database manager (like phpMyAdmin) and it should update your database tables for you.
LANGUAGE UPDATE
For those who have up-to-date language files, you will need to add some new lines to your language files in order to translate the new content being added. Follow the simple edits below:
Modify file application/language/english/content_lang.php (or replace english with the name of your language folder)
Add the following lines of code to the bottom of your language file
// V1.9
$lang['ctn_430'] = "Currently Online";
$lang['ctn_431'] = "Resize Avatar";
$lang['ctn_432'] = "Selecting this option will attempt to resize any user uploaded avatars to the dimensions you specified above for avatars.";
$lang['ctn_433'] = "Max Height";
$lang['ctn_434'] = "Max Width";
$lang['ctn_435'] = "Logged In";
$lang['ctn_436'] = "Logged Out";
$lang['ctn_437'] = "Updated their Social Network details";
$lang['ctn_438'] = "Changed their password";
$lang['ctn_439'] = "Updated their User Settings";
$lang['ctn_440'] = "Posted a comment on a profile: ";
$lang['ctn_441'] = "Deleted a comment on their profile";
$lang['ctn_442'] = "Purchased a Premium Plan:";
$lang['ctn_443'] = "Added a custom field";
$lang['ctn_444'] = "Updated a custom field";
$lang['ctn_445'] = "Deleted a custom field";
$lang['ctn_446'] = "Created a User Role: ";
$lang['ctn_447'] = "Updated a User Role: ";
$lang['ctn_448'] = "Deleted a User Role: ";
$lang['ctn_449'] = "Added a Payment Plan: ";
$lang['ctn_450'] = "Updated a Payment Plan: ";
$lang['ctn_451'] = "Deleted a Payment Plan: ";
$lang['ctn_452'] = "Updated Payment Settings";
$lang['ctn_453'] = "Sent Email to Users";
$lang['ctn_454'] = "Added User Group: ";
$lang['ctn_455'] = "Updated a User Group: ";
$lang['ctn_456'] = "Deleted a User Group: ";
$lang['ctn_457'] = "Added user(s) to group: ";
$lang['ctn_458'] = "Users: ";
$lang['ctn_459'] = "Removed user: ";
$lang['ctn_460'] = "From Group: ";
$lang['ctn_461'] = "Added new email Template";
$lang['ctn_462'] = "Updated Email Template";
$lang['ctn_463'] = "Deleted Email Template";
$lang['ctn_464'] = "Added IP Block: ";
$lang['ctn_465'] = "Deleted IP Block: ";
$lang['ctn_466'] = "Updated User: ";
$lang['ctn_467'] = "Added User: ";
$lang['ctn_468'] = "Deleted User: ";
$lang['ctn_469'] = "Updated Social Settings";
$lang['ctn_470'] = "Updated Global Settings";
$lang['ctn_471'] = "User Logs";
$lang['ctn_472'] = "Action";
$lang['ctn_473'] = "Back To Login";
Save the files
CLEAN INSTALL
Remember, if you have trouble updating, you can always do a clean install. Just follow the guide in the Documentation Guide as you did before and you will have the latest version of the system ready.
Version 1.8 (Released 09/06/2017)
This update includes new features and bug fixes. The following changes/updates were made:
- Updated to CodeIgniter 3.1.4
- User Roles section updated
- Added two new layouts + updated older ones.
- Updated Email Templates system.
- Updated User Profiles, added Profile Comments
- Option for users to enter their social media information in settings.
- Can set max height and max width for avatars in Admin Panel
- Can set max time the dashboard data is cached for in Admin Panel
- Option to disable Profile Comments in Admin Panel
- Implemented 2Checkout Payment Gateway
- Implemented notifications system; get notifications when someone comments on your profile.
- Fixed a bug with forgot password
- Custom Fields now appear on Add member in Admin panel
- Manage a user's User groups from Edit Member
- Brand new setup file which automatically writes the configuration files, setups database and creates admin account for quick setup.
In order to update to the latest version, please overwrite the following files:
- Config
- application/config/config.php
- application/config/config.sample.php
- application/config/database.sample.php
- Controllers
- application/controllers/Admin.php
- application/controllers/Home.php
- application/controllers/Login.php
- application/controllers/Register.php
- application/controllers/Profile.php
- application/controllers/User_settings.php
- application/controllers/IPN.php
- Models
- application/models/Admin_model.php
- application/models/User_model.php
- application/models/Home_model.php
- application/models/IPN_model.php
- Views
- application/views/admin/user_roles.php
- application/views/admin/edit_user_role.php
- application/views/admin/email_templates.php
- application/views/admin/edit_email_template.php
- application/views/admin/settings.php
- application/views/admin/payment_settings.php
- application/views/admin/members.php
- application/views/admin/edit_member.php
- application/views/admin/member_user_group.php
- application/views/layout/*
- application/views/home/change_language.php
- application/views/home/notifications.php
- application/views/home/ajax_notifications.php
- application/views/home/index.php
- application/views/profile/index.php
- application/views/user_settings/index.php
- application/views/user_settings/social_networks.php
- application/views/user_settings/change_password.php
- application/views/funds/index.php
- application/views/setup/*
- application/views/login/index.php
- Hooks
- application/hooks/Language_Switcher.php
- Libraries
- application/libraries/Template.php
- application/libraries/Common.php
- application/libraries/Settings.php
- application/libraries/User.php
- application/libraries/Lib_filter.php
- Language
- application/language/english/content_lang.php
- application/language/english/error_lang.php
- application/language/english/success_lang.php
- Scripts
- scripts/library/sortable/*
- scripts/library/jquery.nicescroll.min.js
- scripts/custom/global.js
- Styles
- styles/layouts/*
- styles/elements.css
- Images
- images/social/linkedin.png
- System
- system/*
- Setup
- setup.php
- sample.htaccess
DATABASE UPDATE
This update contains a change to the database tables. In order to make the system work, you will need to execute the update.sql found in updates/version1.8/sql/update.sql.
Just import this file into your database manager (like phpMyAdmin) and it should update your database tables for you.
LANGUAGE UPDATE
For those who have up-to-date language files, you will need to add some new lines to your language files in order to translate the new content being added. Follow the simple edits below:
Modify file application/language/english/content_lang.php (or replace english with the name of your language folder)
Add the following lines of code to the bottom of your language file
// V1.8
$lang['ctn_389'] = "User Group";
$lang['ctn_390'] = "Address Details";
$lang['ctn_391'] = "Address Line 1";
$lang['ctn_392'] = "Address Line 2";
$lang['ctn_393'] = "City";
$lang['ctn_394'] = "State/Region/Province";
$lang['ctn_395'] = "ZIP/Postal Code";
$lang['ctn_396'] = "Country";
$lang['ctn_397'] = "2Checkout Secret";
$lang['ctn_398'] = "2Checkout Account Number";
$lang['ctn_399'] = "Max Avatar Width & Height";
$lang['ctn_400'] = "Dashboard Cache Time";
$lang['ctn_401'] = "The amount of time the dashboard data is cached for. If you want the data to always be live and not cached, enter 0. Time is in seconds.";
$lang['ctn_402'] = "Profile Comments";
$lang['ctn_403'] = "If you do not wish to allow profile comments, deselect this option to disable them.";
$lang['ctn_404'] = "Hook";
$lang['ctn_405'] = "Email Activation";
$lang['ctn_406'] = "The hook is used to identify the correct email template to get when we need to send an email in a specific function.";
$lang['ctn_407'] = "Add Email Template";
$lang['ctn_408'] = "Available Permissions";
$lang['ctn_409'] = "Current Permissions";
$lang['ctn_410'] = "Drag and drop permissions to customise this User Role.";
$lang['ctn_411'] = "You have no notifications.";
$lang['ctn_412'] = "Notifications";
$lang['ctn_413'] = "Mark All Read";
$lang['ctn_414'] = "Read More";
$lang['ctn_415'] = "Profile Views";
$lang['ctn_416'] = "Comments";
$lang['ctn_417'] = "Comments";
$lang['ctn_418'] = "Activity Status";
$lang['ctn_419'] = "User Information";
$lang['ctn_420'] = "'s Profile";
$lang['ctn_421'] = "Post Comment";
$lang['ctn_422'] = "Social Networks";
$lang['ctn_423'] = "Premium Time";
$lang['ctn_424'] = "Enable Profile Comments";
$lang['ctn_425'] = "Your Website";
$lang['ctn_426'] = "Twitter Username";
$lang['ctn_427'] = "Facebook Username";
$lang['ctn_428'] = "Google Username";
$lang['ctn_429'] = "Linkedin Username";
Modify file application/language/english/success_lang.php (or replace english with the name of your language folder)
Add the following lines of code to the bottom of your language file
// Version 1.8
$lang['success_41'] = "The email template was added!";
$lang['success_42'] = "The email template was deleted!";
$lang['success_43'] = "All notifications have been marked read!";
$lang['success_44'] = "Payment failed!";
$lang['success_45'] = "Comment was posted!";
$lang['success_46'] = "Comment was deleted!";
$lang['success_47'] = "Your data was updated!";
Save the files
CLEAN INSTALL
Remember, if you have trouble updating, you can always do a clean install. Just follow the guide in the Documentation Guide as you did before and you will have the latest version of the system ready.
Version 1.7 (Released 10/01/2017)
This update includes new features and bug fixes. The following changes/updates were made:
- Updated to the latest version of CodeIgniter 3.1.3
- Implemented Google ReCaptcha Option
- Added option to change logo to text in Admin Settings
- Added new Titan Layout + Layout Switcher in Admin Settings
- User Icons now displayed on homepage correctly
- Updated Logo
- Updated layout files to call https includes only
- Add user Payment Log to view their payments
In order to update to the latest version, please overwrite the following files:
- Controllers
- application/controllers/Admin.php
- application/controllers/Register.php
- application/controllers/Funds.php
- Views
- application/views/admin/settings.php
- application/views/register/index.php
- application/views/layout/layout.php
- application/views/layout/titan_layout.php
- application/views/home/index.php
- application/views/funds/index.php
- application/views/funds/plans.php
- application/views/funds/payment_log.php
- Models
- application/models/Admin_model.php
- application/models/User_model.php
- Language
- application/language/english/content_lang.php
- Libraries
- application/libraries/Settings.php
- application/libraries/Template.php
- Third Party
- application/third_party/ReCaptcha/*
- application/third_party/autoload.php
- Styles
- styles/layouts/*
- System
- /system
DATABASE UPDATE
This update contains a change to the database tables. In order to make the system work, you will need to execute the update.sql found in updates/version1.7/sql/update.sql.
Just import this file into your database manager (like phpMyAdmin) and it should update your database tables for you.
LANGUAGE UPDATE
For those who have up-to-date language files, you will need to add some new lines to your language files in order to translate the new content being added. Follow the simple edits below:
Modify file application/language/english/content_lang.php (or replace english with the name of your language folder)
Add the following lines of code to the bottom of your language file
// V1.7
$lang['ctn_379'] = "Logo Option";
$lang['ctn_380'] = "Site Name";
$lang['ctn_381'] = "Site Logo";
$lang['ctn_382'] = "Choose whether to use the site name text as the logo or your uploaded site logo image as the nav bar logo (top left).";
$lang['ctn_383'] = "Site Theme";
$lang['ctn_384'] = "Enable Google ReCaptcha";
$lang['ctn_385'] = "Enable Google ReCAPTCHA is a more advanced, convienient user captcha than the built in CodeIgniter Captcha. It requires Google reCAPTCHA API Keys. Check out the documentation on how to set this up.";
$lang['ctn_386'] = "Google reCAPTCHA Secret Key";
$lang['ctn_387'] = "Google reCAPTCHA Site Key";
$lang['ctn_388'] = "Your Payment Log";
Save the files
CLEAN INSTALL
Remember, if you have trouble updating, you can always do a clean install. Just follow the guide in the Documentation Guide as you did before and you will have the latest version of the system ready.
Version 1.6 (Released 27/10/2016)
This update includes a new feature and updated code. The following changes/updates were made:
- New Stripe Payment Processor for users to use when adding funds to their accounts
- Updated to latest version of CodeIgniter 3.1.1
In order to update to the latest version, please overwrite the following files:
- Config
- application/config/config.php
- Controllers
- application/controllers/Admin.php
- application/controllers/Funds.php
- application/controllers/IPN.php
- Models
- application/models/Admin_model.php
- Libraries
- application/libraries/Settings.php
- Third Party
- application/third_party/stripe/*
- Views
- application/views/admin/payment_settings.php
- application/views/admin/payment_logs.php
- application/views/funds/index.php
- Language
- application/languages/english/content_lang.php
- application/languages/english/error_lang.php
- application/languages/english/success_lang.php
- System
- system/*
DATABASE UPDATE
This update contains a change to the database tables. In order to make the system work, you will need to execute the update.sql found in updates/version1.6/sql/update.sql.
Just import this file into your database manager (like phpMyAdmin) and it should update your database tables for you.
LANGUAGE UPDATE
For those who have up-to-date language files, you will need to add some new lines to your language files in order to translate the new content being added. Follow the simple edits below:
Modify file application/language/english/content_lang.php (or replace english with the name of your language folder)
Add the following lines of code to the bottom of your language file
// Version 1.6
$lang['ctn_376'] = "Stripe Secret Key";
$lang['ctn_377'] = "Stripe Publishable Key";
$lang['ctn_378'] = "Processor";
Modify file application/language/english/error_lang.php (or replace english with the name of your language folder)
Add the following lines of code to the bottom of your language file
$lang['error_79'] = "Invalid Payment!";
$lang['error_80'] = "Your card has been declined by the payment gateway (STRIPE).";
Modify file application/language/english/success_lang.php (or replace english with the name of your language folder)
Add the following lines of code to the bottom of your language file
$lang['success_40'] = "Your credits were succcessfully paid for and added to your account!";
Save the files
CLEAN INSTALL
Remember, if you have trouble updating, you can always do a clean install. Just follow the guide in the Documentation Guide as you did before and you will have the latest version of the system ready.
Version 1.5 (Released: 19/10/2016)
This updates includes new features and bug fixes. The folllowing changes/updates were made:
- Implemented new Datatables for looking up Members. Allows faster searching + AJAX viewing.
- Implemented new method for redirecting to a custom url after logging in.
- Upgraded the system files to CodeIgniter version 3.1
- Added in Bootstrap Theme.
- Redesign Payment Plans area.
- Added in Color Picker for when picking Payment Plans theme.
- Implemented User Avatar Displays to show user's avatar + whether they are online/offline.
- Implemented new Custom Fields option. Add custom fields to Registration, User Settings, Profile.
- Option to turn off Secure Login to allow users to stay logged in on multiple devices.
- Removed User Avatar size restrictions.
- Set default User Role in Admin Panel.
- Removed old Member User Level (replaced with User Role).
- Removed Banned User Level (replaced with User Role).
- User Roles styling updated.
- Fixed bug when paginating through User Groups Member List.
In order to update, we recommend doing a clean install. However, if this is not possible due to too many changes, please overwrite the following files:
- Controllers
- application/controllers/Login.php
- application/controllers/User_settings.php
- application/controllers/Members.php
- application/controllers/Admin.php
- application/controllers/Register.php
- application/controllers/Profile.php
- Views
- application/views/layout/layout.php
- application/views/layout/login_layout.php
- application/views/login/index.php
- application/views/members/index.php
- application/views/admin/members.php
- application/views/admin/edit_member.php
- application/views/admin/payment_logs.php
- application/views/admin/payment_plans.php
- application/views/admin/edit_payment_plan.php
- application/views/admin/premium_users.php
- application/views/admin/user_roles.php
- application/views/admin/edit_user_role.php
- application/views/admin/settings.php
- application/views/register/add_username.php
- application/views/register/index.php
- application/views/admin/custom_fields.php
- application/views/admin/edit_custom_field.php
- application/views/user_settings/index.php
- application/views/funds/plans.php
- application/views/profile/index.php
- Models
- application/models/User_model.php
- application/models/Admin_model.php
- application/models/Login_model.php
- Libraries
- application/libraries/Common.php
- application/libraries/Settings.php
- application/libraries/Datatables.php
- application/libraries/User.php
- Languages
- application/languages/english/content_lang.php
- application/languages/english/success_lang.php
- application/languages/english/error_lang.php
- Main
- /system
- /styles/main.css
- /styles/responsive.css
- /scripts/jscolor.min.js
DATABASE UPDATE
This update contains a change to the database tables. In order to make the system work, you will need to execute the update.sql found in updates/version1.5/sql/update.sql.
Just import this file into your database manager (like phpMyAdmin) and it should update your database tables for you.
LANGUAGE UPDATE
For those who have up-to-date language files, you will need to add some new lines to your language files in order to translate the new content being added. Follow the simple edits below:
Modify file application/language/english/content_lang.php (or replace english with the name of your language folder)
Add the following lines of code to the bottom of your language file
// Version 1.5
$lang['ctn_334'] = "Online";
$lang['ctn_335'] = "Offline";
$lang['ctn_336'] = "Search ...";
$lang['ctn_337'] = "Like";
$lang['ctn_338'] = "Exact";
$lang['ctn_339'] = "User";
$lang['ctn_340'] = "First Name";
$lang['ctn_341'] = "Last Name";
$lang['ctn_342'] = "User Role";
$lang['ctn_343'] = "Users with this permission will not be able to login.";
$lang['ctn_344'] = "Default User Role";
$lang['ctn_345'] = "This is the default user role given to users when they register.";
$lang['ctn_346'] = "Custom Fields";
$lang['ctn_347'] = "Icon";
$lang['ctn_348'] = "The icon displayed on the plan. You can choose from these icons:";
$lang['ctn_349'] = "Just paste the icon name into the field.";
$lang['ctn_350'] = "Credits";
$lang['ctn_351'] = "* = Required.";
$lang['ctn_352'] = "Name";
$lang['ctn_353'] = "Textarea";
$lang['ctn_354'] = "Checkbox";
$lang['ctn_355'] = "Radio";
$lang['ctn_356'] = "Select";
$lang['ctn_357'] = "Text Field";
$lang['ctn_358'] = "Field Type";
$lang['ctn_359'] = "Options";
$lang['ctn_360'] = "If using Checkbox, Radio or Select field types, you can specify the options available by adding a list of values separated by a comma. Example: Red,Blue,Yellow,Green.";
$lang['ctn_361'] = "Required";
$lang['ctn_362'] = "If selected, the user will be required to fill this field.";
$lang['ctn_363'] = "Can Edit";
$lang['ctn_364'] = "If selected, the user will be able to modify this value from the User Settings page.";
$lang['ctn_365'] = "View On Profile";
$lang['ctn_366'] = "If selected, the user's answer to this field will be visible on the user's profile.";
$lang['ctn_367'] = "Register";
$lang['ctn_368'] = "If selected, this field will appear on the registration form.";
$lang['ctn_369'] = "Help Text";
$lang['ctn_370'] = "The text entered here will be displayed below the field (like this).";
$lang['ctn_371'] = "Edit Field";
$lang['ctn_372'] = "Custom Fields allow you collect extra data about the users who register.";
$lang['ctn_373'] = "Add Custom Field";
$lang['ctn_374'] = "Enable Secure Login";
$lang['ctn_375'] = "When this option is enabled, each time a user logs in their \"login-token\" is refreshed, making old ones invalid. This prevents multiple people from logging into the same account.";
Modify file application/language/english/error_lang.php (or replace english with the name of your language folder)
Add the following lines of code to the bottom of your language file
$lang['error_75'] = "Name of the field cannot be empty!";
$lang['error_76'] = "Invalid Field Type";
$lang['error_77'] = "Invalid Custom Field!";
$lang['error_78'] = "You left a required field empty: ";
Modify file application/language/english/success_lang.php (or replace english with the name of your language folder)
Add the following lines of code to the bottom of your language file
$lang['success_36'] = "This account has been deactivated and can no longer be used.";
$lang['success_37'] = "The field was successfully added!";
$lang['success_38'] = "The field was successfully updated!";
$lang['success_39'] = "The field was deleted!";
Save the files
CLEAN INSTALL
Remember, if you have trouble updating, you can always do a clean install. Just follow the guide in the Documentation Guide as you did before and you will have the latest version of the system ready.
Version 1.4 (Released: 24/08/2016)
This update includes new features and bug fixes. The following changes/updates were made:
- Fixed a bug with user permissions
- Improved UI of buttons
- Added in new extra scripts for protecting logged in pages. Check the documentation for a detailed guide: http://documentation.patchesoft.com/client/document/2/58
In order to update, please overwrite the following files:
Files to be updated:
-
application/libraries/Common.php
-
application/libraries/Settings.php
-
application/controllers/Home.php
-
application/views/admin/payment_plans.php
-
application/views/admin/premium_users.php
-
application/views/admin/email_templates.php
-
application/views/admin/ipblock.php
-
application/views/admin/groups.php
-
application/views/admin/user_roles.php
-
application/views/admin/members.php
CLEAN INSTALL
Remember, if you have trouble updating, you can always do a clean install. Just follow the guide in the Documentation Guide as you did before and you will have the latest version of the system ready.
Version 1.3 (Released: 10/06/2016)
This update includes new features and bug fixes. The following changes/updates were made:
- Added missing hook for changing languages
- Added an Install Notification for new installs
- Added new option to enable Brute Force Login protection
- Updated Layout
- Fixed a bug for paypal payments
- Option to enable Email Activation for newly registered members
- Updated Documentation
In order to update, we recommend doing a clean install of the system files (overwrite all files). However, if you have made several changes to your system, the following files need to be updated/overwritten:
Files to be updated
- application/config/hooks.php
- application/config/config.php
- application/controllers/Admin.php
- application/controllers/Login.php
- application/controllers/Register.php
- application/models/Install_model.php
- application/models/Login_model.php
- application/models/User_model.php
- styles/main.css
- styles/light.css
- application/libraries/Common.php
- application/libraries/User.php
- application/libraries/Settings.php
- ALL VIEWS: application/views/*
DATABASE UPDATE
This update contains a change to the database tables. In order to make the system work, you will need to execute the update.sql found in updates/version1.3/sql/update.sql.
Just import this file into your database manager (like phpMyAdmin) and it should update your database tables for you.
LANGUAGE UPDATE
For those who have up-to-date language files, you will need to add some new lines to your language files in order to translate the new content being added. Follow the simple edits below:
Modify file application/language/english/content_lang.php (or replace english with the name of your language folder)
Add the following lines of code to the bottom of your language file
$lang['ctn_327'] = "Brute Force Login Protection";
$lang['ctn_328'] = "Prevents a user from being able to repeatedly guess a user's login credntials. After 5 attempts, it blocks them out for 15 minutes.";
$lang['ctn_329'] = "Email Account Activation";
$lang['ctn_330'] = "If this option is enabled, when a user registers an account they will need to activate their account by clicking an activate link in their email.";
$lang['ctn_331'] = "Activate User";
$lang['ctn_332'] = "No";
$lang['ctn_333'] = "Yes";
Modify file application/language/english/error_lang.php (or replace english with the name of your language folder)
Add the following lines of code to the bottom of your language file
$lang['error_68'] = "You have attempted to login too many times! Please wait 15 minutes before trying again.";
$lang['error_69'] = "Invalid Code!";
$lang['error_70'] = "You must wait 15 minutes before sending another email activation request.";
$lang['error_71'] = "Invalid User!";
$lang['error_72'] = "You must activate your account before you can login.";
$lang['error_73'] = "Click here";
$lang['error_74'] = "to resend activation code to your email address.";
Modify file application/language/english/success_lang.php (or replace english with the name of your language folder)
Add the following lines of code to the bottom of your language file
$lang['success_33'] = "You have successfully registered an account! An email has been sent to your email address containing a link required to click to activate your account.";
$lang['success_34'] = "Thank you for activating your account! You can now login!";
$lang['success_35'] = "An email has been sent to the address for that account.";
Save the files
CLEAN INSTALL
Remember, if you have trouble updating, you can always do a clean install. Just follow the guide in the Documentation Guide as you did before and you will have the latest version of the system ready.
Version 1.2 (Released: 4/12/2016)
This update includes new features. The following changes/updates were made:
- Updated PasswordHash to work with PHP 7.0+
- Fixed issue with Mktime in PHP 7.0+
- Implemented new time conversion function
- Currency Symbol set in Payment Settings now applied to Plans page
- Revamped Login Page
- Can now set page title for each individual page from within Controllers
- Users can now login with their email address and username
- Implemented new User Roles system (replaces are User Level). Add User Roles which have access to various parts of the site. Super Admin, Admin Members (manage members, cannot add/edit admin members), Admin Payment (manage payment options/logs), Admin Settings (manage global and social media settings).
- Premium Users list in Admin Panel
- Added Last Logged in to dashboard
- Implemented Favicon
- Updated Dashboard
- Updated User Profiles
- Upgraded system core files (CodeIgniter Version 3.0.6)
In order to update, we recommend doing a clean install of the system files (overwrite all files). However, if you have made several changes to your system, the following files need to be updated/overwritten:
NEW FILES
- application/views/admin/user_roles.php
- application/views/admin/edit_user_role.php
- application/views/admin/premium_users.php
- styles/light.css
- images/favicon/*
Files to be updated
- application/libraries/PasswordHash.php
- application/libraries/Common.php
- application/libraries/Template.php
- application/libraries/User.php
- application/libraries/Settings.php
- application/controllers/Home.php
- application/controllers/Login.php
- application/controllers/Admin.php
- application/controllers/Members.php
- application/controllers/Install.php
- application/controllers/Profile.php
- application/controllers/Test.php
- application/controllers/Funds.php
- application/models/Login_model.php
- application/models/Admin_model.php
- application/models/Register_model.php
- application/models/User_model.php
- application/models/Install_model.php
- application/languages/english/content_lang.php
- application/languages/english/success_lang.php
- application/languages/english/error_lang.php
- application/views/layout/layout.php
- application/views/layout/login_layout.php
- application/views/funds/plans.php
- application/views/User_settings/index.php
- application/views/login/index.php
- application/views/register/index.php
- application/views/members/index.php
- application/views/members/search.php
- application/views/home/index.php
- application/views/profile/index.php
- application/views/admin/edit_member.php
- application/views/admin/members.php
- application/views/admin/search_members.php
- system/*
- application/config/mimes.php
- application/config/constants.php
- styles/main.css
- styles/login_layout.css
- images/social/*
DATABASE UPDATE
This update contains a change to the database tables. In order to make the system work, you will need to execute the update.sql found in updates/version1.2/sql/update.sql. Before you Import this file, you need to update the file to include your Admin Username. We have updated the way Admin permissions work with User Roles.
Open up the file: updates/version1.2/sql/update.sql and modify the line below to include your username. Save the file.
UPDATE `users` SET `user_role` = 1 WHERE `username` = ‘YOUR_ADMIN_USERNAME_HERE’;
Just import this file into your database manager (like phpMyAdmin) and it should update your database tables for you.
LANGUAGE UPDATE
For those who have up-to-date language files, you will need to add some new lines to your language files in order to translate the new content being added. Follow the simple edits below:
Modify file application/language/english/content_lang.php (or replace english with the name of your language folder)
Add the following lines of code to the bottom of your language file
// Version 1.2
$lang['ctn_294'] = "Days";
$lang['ctn_295'] = "Day";
$lang['ctn_296'] = "Hours";
$lang['ctn_297'] = "Hour";
$lang['ctn_298'] = "Minutes";
$lang['ctn_299'] = "Minute";
$lang['ctn_300'] = "Seconds";
$lang['ctn_301'] = "Second";
$lang['ctn_302'] = "and";
$lang['ctn_303'] = "Email or Username";
$lang['ctn_304'] = "Welcome to";
$lang['ctn_305'] = "Register an Account";
$lang['ctn_306'] = "Enter the code above";
$lang['ctn_307'] = "Permissions";
$lang['ctn_308'] = "Super Admin";
$lang['ctn_309'] = "Admin Settings";
$lang['ctn_310'] = "Admin Members";
$lang['ctn_311'] = "Admin Payment";
$lang['ctn_312'] = "Access to all Admin Panel options.";
$lang['ctn_313'] = "Access to Admin Panel Global Settings, Social Media Settings.";
$lang['ctn_314'] = "Access to Admin Panel Manage Members, User Groups, IP Blocking, Email Members.";
$lang['ctn_315'] = "Access to Admin Panel Payment Plans, Payment Logs, Payment Settings.";
$lang['ctn_316'] = "User Roles";
$lang['ctn_317'] = "Are you sure you want to delete this?";
$lang['ctn_318'] = "User Roles allow you to create specific permissions for users. Each user can have one User Role which gives them access to various areas of the site. You can give a user a role via the Manage Members section.";
$lang['ctn_319'] = "Add User Role";
$lang['ctn_320'] = "Role Name";
$lang['ctn_321'] = "Edit User Role";
$lang['ctn_322'] = "User Role";
$lang['ctn_323'] = "Premium Plan";
$lang['ctn_324'] = "Time Left";
$lang['ctn_325'] = "Premium Users";
$lang['ctn_326'] = "You last logged in on";
Modify file application/language/english/success_lang.php (or replace english with the name of your language folder)
Add the following lines of code to the bottom of your language file
// Version 1.2
$lang['success_30'] = "The user role was added!";
$lang['success_31'] = "User role was updated!";
$lang['success_32'] = "User Role was deleted!";
Modify file application/language/english/error_lang.php (or replace english with the name of your language folder)
Add the following lines of code to the bottom of your language file
$lang['error_64'] = "Role Name cannot be empty!";
$lang['error_65'] = "User role does not exist!";
$lang['error_66'] = "Only a Super Admin can change the User Role of a member!";
$lang['error_67'] = "You need to be a Super Admin user in order to create Admin Privileged Users";
Save the files
CLEAN INSTALL
Remember, if you have trouble updating, you can always do a clean install. Just follow the guide in the Documentation Guide as you did before and you will have the latest version of the system ready.
Version 1.1 (Released: 12/01/2016)
This update includes new features and updated system files. The following changes/updates were made:
- New Add Funds to User Accounts via PayPal (micro-transactions)
- Enable Payment Options in Admin Panel
- Set PayPal Address and Paypal Currency
- Automatically get funds added to user accounts when they pay via PayPal
- Enable/Disable Paument option will hide/show Payment Options on the site.
- Set the currency symbol in Admin panel.
- Updated to latest version of CodeIgniter 3.0.3
- Added new Payment Plans Option to Admin Panel
- Edit Payment Plans/Delete
- Can update a User's funds/credits via Admin Panel Edit Members section
- Implemented Payment Plans page where users can select a plan to increase their Premium Time.
- Premium Time and User Credits amount can be viewed in Settings page
- Implemented Global Premium setting which when enabled requires a user to have Premium in order to access most pages on the site.
- Implemented a Premium Test page which will only allow a user to visit once they have premium.
- Payment Logs in Admin Panel.
In order to update, we recommend doing a clean install of the system files (overwrite all files). However, if you have made several changes to your system, the following files need to be updated/overwritten:
NEW FILES
- application/controllers/Funds.php
- application/controllers/IPN.php
- application/controllers/paypal/*
- application/views/funds/*
- application/views/admin/payment_settings.php
- application/views/admin/payment_plans.php
- application/views/admin/payment_logs.php
- application/views/admin/edit_payment_plan.php
- application/views/test/Premium.php
- images/paypal.png
- application/models/Ipn_model.php
- application/models/Funds_model.php
Files to be updated
- application/controllers/Admin.php
- application/controllers/Members.php
- application/controllers/Test.php
- application/controllers/Profile.php
- application/models/User_model.php
- application/models/Admin_model.php
- application/libraries/Settings.php
- application/libraries/Users.php
- application/views/layout/layout.php
- application/views/admin/edit_member.php
- application/views/user_settings/index.php
- application/config/*
- application/languages/english/*
- styles/main.css
- index.php
- system/
DATABASE UPDATE
This update contains a change to the database tables. In order to make the system work, you will need to execute the update.sql found in updates/version1.1/sql/update.sql. Just import this file into your database manager (like phpMyAdmin) and it should update your database tables for you.
LANGUAGE UPDATE
For those who have up-to-date language files, you will need to add some new lines to your language files in order to translate the new content being added. Follow the simple edits below:
Modify file application/language/english/content_lang.php (or replace english with the name of your language folder)
Add the following lines of code to the bottom of your language file
			// Version 1.1
$lang['ctn_245'] = "Add Funds";
$lang['ctn_246'] = "Payment Settings";
$lang['ctn_247'] = "Below you can purchase funds for your account. You can then use these funds to pay for subscriptions to this site. Please check below how much funds you would like to add to your Account Balance.";
$lang['ctn_248'] = "Your current balance is";
$lang['ctn_249'] = "Purchase";

$lang['ctn_250'] = "Funds";
$lang['ctn_251'] = "Enable Payments Option";
$lang['ctn_252'] = "If you disable Payments Option, users won't be able to add funds to their accounts and all options will be hidden from the site.";
$lang['ctn_253'] = "PayPal Email";
$lang['ctn_254'] = "Enter your PayPal account so you can receive payments.";
$lang['ctn_255'] = "PayPal Currency Code";
$lang['ctn_256'] = "Enter the currency code for which you wish to receive payments in. A list of PayPal Currency Codes can be found here";
$lang['ctn_257'] = "Currency Symbol";

$lang['ctn_258'] = "Payment Plans";
$lang['ctn_259'] = "Here you can manage the Payment Plans that your users can purchase. In order for users to be able to buy them, you must have Payment Options enabled.";

$lang['ctn_260'] = "Plan Name";
$lang['ctn_261'] = "Cost";
$lang['ctn_262'] = "Days Given";
$lang['ctn_263'] = "Sales";
$lang['ctn_264'] = "Add Payment Plan";
$lang['ctn_265'] = "Credits Cost";
$lang['ctn_266'] = "Background Color";
$lang['ctn_267'] = "The amount of days added to the user's premium time when this plan is purchased. Select 0 for unlimited time.";
$lang['ctn_268'] = "Add Plan";
$lang['ctn_269'] = "Edit Payment Plans";

$lang['ctn_270'] = "You can modify the Payment Plan below.";
$lang['ctn_271'] = "Description";
$lang['ctn_272'] = "Font Color";
$lang['ctn_273'] = "Premium Plans";
$lang['ctn_274'] = "Below you can purchase Premium Plans that add premium time to your account, meaning you gain access to any content in our Premium Service. To add funds to your account, visit our";
$lang['ctn_275'] = "page";
$lang['ctn_276'] = "You currently have ";
$lang['ctn_277'] = "Days";
$lang['ctn_278'] = "Hours";
$lang['ctn_279'] = "Minutes and";

$lang['ctn_280'] = "Seconds";
$lang['ctn_281'] = "of Premium Time left on your account.";
$lang['ctn_282'] = "You currently have UNLIMITED Premium Time on your account.";
$lang['ctn_283'] = "Unlimited Days";
$lang['ctn_284'] = "Buy Plan";
$lang['ctn_285'] = "View our Premium Plans.";
$lang['ctn_286'] = "Require Premium Global";
$lang['ctn_287'] = "Enabling this setting will require all users to have Premium Time on their account in order to access most pages on the site (with the exception of the add funds/plan choosing pages/settings).";
$lang['ctn_288'] = "Payment Logs";
$lang['ctn_289'] = "Premium Page";

$lang['ctn_290'] = "Whenever a user adds funds to their account, a transaction log is recorded. Below you can view any Payment Logs that have been recorded.";
$lang['ctn_291'] = "PayPal Email";
$lang['ctn_292'] = "Amount";
$lang['ctn_293'] = "Date";
Modify file application/language/english/success_lang.php (or replace english with the name of your language folder)
Add the following lines of code to the bottom of your language file
			// Version 1.1
$lang['success_24'] = "Payment Settings updated!";
$lang['success_25'] = "Payment Plan added!";
$lang['success_26'] = "Payment Plan updated!";
$lang['success_27'] = "Payment Plan deleted!";
$lang['success_28'] = "You have purchased the plan, thank you!";
$lang['success_29'] = "You need a Premium Account in order to access that area of the site! Choose a plan below.";
Modify file application/language/english/error_lang.php (or replace english with the name of your language folder)
Add the following lines of code to the bottom of your language file
//Version 1.1
$lang['error_60'] = "Payments have been disabled!";
$lang['error_61'] = "Invalid Plan!";
$lang['error_62'] = "You do not have enough credits to purchase this plan!";
$lang['error_63'] = "You already have the Unlimited Premium Time package!";
Save the files
CLEAN INSTALL
Remember, if you have trouble updating, you can always do a clean install. Just follow the guide in the Documentation Guide as you did before and you will have the latest version of the system ready.
Version 1.0.1
This update includes a small bug fix. All you need to do is overwrite the following files:
- application/controllers/User_settings.php
- application/controllers/Register.php
Version 1.0
This is the first version. No update needed.
CLEAN INSTALL
Remember, if you have trouble updating, you can always do a clean install. Just follow the guide in the Documentation Guide as you did before and you will have the latest version of the system ready.
Credits - top
This document is used to credit various tools, images, styles and general users who have helped make this product what it is. Feel free to give their websites a visit and look around- you might even find some useful tools for your own website.
- Bootstrap 3.0 http://getbootstrap.com/
- CodeIgniter http://ellislab.com/codeigniter
- Lib Filter http://code.iamcal.com/php/lib_filter/
- PHPass http://www.openwall.com/phpass/
- Libel Suit Font http://typodermicfonts.com/
- CKEditor LGPL http://ckeditor.com/
- Photo by Casey Horner on Unsplash